[Codester] – Orange Flat Amazing MyBB Theme – Freebies Free Download

[Codester] – Orange Flat Amazing MyBB Theme – Freebies Free Download

Orange MyBB theme is an amazing flat MyBB theme, responsive and tested on all devices. Orange flat MyBB theme is compatible with most of the MyBB plugins and this theme is really easy to edit and comes with proper documentation.

Live Preview Screenshot

Features

  • All pages are responsive with perfect reading scores
  • Css3 based theme with least usage of images to make site fast
  • Pattern based header which looks just amazing
  • Use of font-awesome icons
  • Contains a default favicon icon
  • Better Menu system that is responsive and based on useragent
  • Breadcrumb navigation for active location in forum
  • Proper usage of h1 tags on navigation pan for SEO benefits
  • Css3 based Buttons
  • Easy to install and use for any plugin from MyBB Mods
  • Super fast loading on all devices
  • Redesigned quotes and code blocks

Orange is a flat MyBB theme which really suits the name of orange theme.

Requirements

  • Latest version of MyBB 1.8.*

Instructions

1. Upload all contents of “Upload” folder in MyBB root

2. Go to Admin CP of MyBB and click on Templates and Style Tab
3. Click on “Import a Theme” Tab and import the Orange-theme.xml provided with this package.
4. Click on Import Theme after selecting the xml
5. Select Themes from left tab and from Controls on Right side, Set Go Dark Theme as Default.

Enjoy using Orange Flat MyBB Theme, in case of any issues contact at
https://wallbb.co.uk/forums/fo…
https://wallbb.co.uk/contact-u…

6 points you need to know about async/await in JavaScript

6 points you need to know about async/await in JavaScript

If you have faced a code like below, then this article will help you in multiple ways ?.

fetchPizzas()
  .then((pizzas) => {
    return sortByToppings(pizzas)
      .then((pizzas) => {
        return checkDeliveryOptions(pizzas)
          .then((pizzasWithDelivery) => {
            return checkBirthdayGift(pizzasWithDelivery)
              .then((pizza) => {
                return sendToCustomer(pizza);
              });
          });
      });
  });

A little bit of background

There are many a times where we have a bunch of tasks to be executed sequentially. The examples are from File handling to calling databases multiple times based on the result of the previous call. Or calling multiple APIs in a sequence where one call is dependent on another.

Prior to introduction of async/await, many used callbacks alongside setTimeOut to simulated the behaviour they wanted (aka callback hell). Later on people started to use promises which made the code much more readable but they would end up in the same place when the number of calls where high (aka promise hell).

Async functions

A function in JavaScript is async when it operates asynchronously via the event loop, using an implicit promise to return its result. Furthermore, the type of its result should be an AsyncFuncton object.

This function is nothing but a combination of promises and generators. I will not going into details of generators, but they usually contains one or many yield keywords.

Now lets see the async function in action. Assume we have a function which returns a string:

function hi() {
  return 'Hi from JavaScript';
}

hi(); // 'Hi from JavaScript'

If we put async in front of the function, then it no longer returns string, it will be a promise which is wrapped around the string value automatically.

async function hi() {
  return 'Hi from JavaScript';
}

hi(); // Promise {<resolved>: "Hi from JavaScript"}

Now in order to get the value from the promise we act like before:

hi().then(console.log); // 'Hi from JavaScript'

You might be wondering how this can help to solve the promise hell. Just bare with me and we’ll get there step by step with examples so it’d be clear when we’re finished.

Await

The await makes JavaScript engine to wait until a promise is resolved/rejected and returns it’s result. This keyword can only be used inside an async function.

const doSomething = async () => {
  console.log(await hi())
};

// 'Hi from JavaScript'

You might think since await forces the JavaScript engine to wait, it will have some cost on CPU. But that’s not the case because the engine can perform other scripts while waiting for the promise to get resolves/rejected. Plus this is way more elegant that using promises and .then.

Warning: If you try to invoke an async function using await inside a normal function, you will get a syntax error.

function doSomething() {
  await hi(); // Uncaught SyntaxError: await is only valid in async function
}

A small catch

Most people who start working with async/await forget that they can’t invoke an async function on top level code. This is due to the fact that we can’t have await inside a normal function and the top level functions are normal by default.

let response = await hi(); // syntax error in top-level code
console.log(response);

What you can do however, is to wrap your code in an async IIFE(immediately invoked function execution) and call it right there:

(async () => {
  let response = await hi(); 
  console.log(response); // 'Hi from JavaScript'
  ...
})();

Update: As Nick Tyler mentioned in the comments, there is a stage 3 proposal to support await in top level code. So stay tuned and watch this space:

Error handling

As I said before, most async functions can be written as a normal function with promises. However, async functions are less error-prone when it comes to error handling. If an awaited call fails, the exception is automatically caught and the Error object will be propagated to the caller using the implicit return promise.

Prior to this, we had to reject the promise which was returned from the normal function and use a .catch in the caller. I’ve seen many places where the developers used a try/catch and throw a new exception which meant the stack trace would be reset.

async function hi() {
  throw new Error("Whoops!");
};

async function doSomething() {

  try {
    let response = await hi();
    return response;
  } catch(err) {    
    console.log(err);
  }
}

doSomething();

Or you can avoid the try/catch because the promise generated by the call to hi becomes rejected. Then simply use .catch to handle the error.

async function hi() {
  throw new Error("Whoops!");
};

async function doSomething() {
  let response = await hi();
  return response;
}

doSomething().catch(err => {
  console.log(err);
});

You can ignore the catch all together and handle all the exceptions using a global exception handler if you think that’s more suitable to your situation. Something like this which uses the onrejectionhandled property of WindowsEventHandlers mixin.

window.onrejectionhandled = function(e) {
  console.log(e.reason);
}

Promise.all compatibility

You can use async/await alongside Promise.all to wait for multiple promises:

const responses = await Promise.all([
  fetch('yashints.dev/rss'),
  hi(),
  ...
])

If an error occurs, it propagates as usual, from the failed promise to Promise.all and then turns to an exception that you can catch using any of the above methods.

await can take in a “thenable”

Similar to promise.then, if you have any object which has a .then method, await will accepts it. This is to support scenarios where a 3rd-party object which is not a promise, but promise-compatible (it supports .then), it would be enough to use it with await.

class Greeting {
  constructor(name) {
    this.name = name;
  }

  then(resolve, reject) {
    console.log(resolve);

    setTimeout(() => resolve(`Hi ${this.name}`));
  }
};

async function greet() {
  const greeting = await Greeting('Yaser');

  console.log(greeting); // Hi Yaser
};

greet();

async class methods

You can have an async class method. Just prepend it with async and you’re good to go.

class Order {
  async deliver() {
    return await Promise.resolve('Pizza');
  }
}

new Order()
  .delivery()
  .then(console.log); // Pizza

Summary

Just to quickly go through what we discussed so far:

  1. async keyword makes a method asynchronous, which in turn always returns a promise and allows await to be used.
  2. await keyword before a promise makes JavaScript wait until that is resolved/rejected. If the promise is rejected, an exception is generated, otherwise the result is returned.
  3. Together, they provide a great opportunity for us to write clean, more testable, asynchronous code.
  4. With async/await you wouldn’t need .then/.catch, but just note that they are still based on promises.
  5. You can use Promise.all to wait for multiple async functions calls.
  6. You can have an async method in a class.

I know there are many great articles around async/await, but I tried to cover some items where I had to constantly remind myself of. Hope it will help you to have a centralised place for most of what you need to write clean asynchronous JavaScript.

Have fun exploring these points.

Credit @Dev.To

13 Tips to Write Faster, Better-Optimized JavaScript

13 Tips to Write Faster, Better-Optimized JavaScript

10 years ago, Amazon shared that every 100ms of latency cost them 1% in sales revenue: across an entire year, 1 second of added load time would cost the company in the region of $1.6 billion. Similarly, Google found that an extra 500ms seconds in search page generation time reduced their traffic by 20%, slicing a fifth off their potential ad revenue.

Few of us may have to deal with such dramatic figures as Amazon and Google, but the same principles apply even on a smaller scale: faster code creates a better user experience and it’s better for business. Especially in web development, speed may be the critical factor thing that gives you an edge on your competitors. Every wasted millisecond on a faster network is amplified on a slow network.

In this article, we’ll look into 13 practical ways that you can increase the speed of your JavaScript code — whether you’re writing server-side code with Node.js or client-side JavaScript. Wherever possible, I’ve included links to benchmark tests created with https://jsperf.com. If you’d like to test these tips for yourself, make sure to click on those links!


A man walking up some steps.

A man walking up some steps.

Avoid unnecessary steps — photo by Jake Hills on Unsplash

Do It Less

“The fastest code is the code that never runs.”

1. Remove Unnecessary Features

It’s easy to jump into optimizing code that’s already been written, but often the biggest performance gains come from taking a step back and asking whether our code needed to be there in the first place.

Before moving on to individual optimisations, ask yourself whether your program needs to do everything that it’s doing. Is that feature, component or function necessary? If not, remove it. This step is incredibly important to improving the speed of your code, but it is easily overlooked!

2. Avoid Unnecessary Steps

Benchmark: https://jsperf.com/unnecessary-steps

On a smaller scale, is every step a function takes necessary to get to the end result? For example, does your data jump through unnecessary hoops in order to get to the end result? The following example may be oversimplified, but it represents something that can be much harder to spot in a larger codebase:

'incorrect'.split('').slice(2).join('');  // converts to an array
'incorrect'.slice(2);                     // remains a string 

Even in this simple example, the difference in performance is dramatic — running some code is a lot slower than running no code! Though few people would make the mistake above, in longer and more complex code it can be easy to add in unnecessary steps to get to the desired end result. Avoid them!


A loop at the top of a rollercoaster.

A loop at the top of a rollercoaster.

Break out of loops as early as possible — photo by Claire Satera on Unsplash

Do It Less Often

If you can’t remove code, ask yourself if you can do it less often. One of the reasons code is so powerful is that it can allow us to easily repeat actions, but it’s also easy to perform tasks more often than necessary. Here are some specific cases to look out for.

3. Break Out of Loops As Early As Possible

Benchmark: https://jsperf.com/break-loops/1

Look out for cases where it’s not necessary to complete every iteration in a loop. For example, if you’re searching for a particular value and find that value, subsequent iterations are unnecessary. You should break terminate the execution of the loop by using a break statement:

for (let i = 0; i < haystack.length; i++) {
  if (haystack[i] === needle) break;
}

Or, if you need to perform actions on only certain elements in a loop, you can skip performing the actions on the other elements using the continuestatement. continue terminates the execution of the statements in the current iteration and immediately moves on to the next one:

for (let i = 0; i < haystack.length; i++) {
  if (!haystack[i] === needle) continue;
  doSomething();
}

It’s also worth remembering that it’s possible to break out of nested loops using labels. These allow you to associate a break or continue statement with a specific loop:

loop1: for (let i = 0; i < haystacks.length; i++) {
  loop2: for (let j = 0; j < haystacks[i].length; j++) {
    if (haystacks[i][j] === needle) {
      break loop1;
    }
  }
}

4. Pre-Compute Once Wherever Possible

Benchmark: https://jsperf.com/pre-compute-once-only

Take the following function, which we’d like to call multiple times in our app:

function whichSideOfTheForce(name) {
  const light = ['Luke', 'Obi-Wan', 'Yoda']; 
  const dark = ['Vader', 'Palpatine'];
  
  return light.includes(name) ? 'light' : 
    dark.includes(name) ? 'dark' : 'unknown';
};whichSideOfTheForce('Yoda');   // returns "light"
whichSideOfTheForce('Anakin'); // returns "unknown"

The problem with this code is that every time we call whichSideOfTheForce , we create a new object. With every function call, memory is unnecessarily re-allocated to our light and dark arrays.

Given the values in light and dark are static, a better solution would be to declare these variables once and then reference them when calling whichSideOfTheForce . While we could do this by defining our variables in global scope, this would allow them to be tampered with outside of our function. A better solution is to use a closure, and that means returning a function:

function whichSideOfTheForce2(name) {
  const light = ['Luke', 'Obi-Wan', 'Yoda'];
  const dark = ['Vader', 'Palpatine'];
  return name => light.includes(name) ? 'light' :
    dark.includes(name) ? 'dark' : 'unknown';
};

Now, the light and dark arrays will only be instantiated once. The same goes for nested functions. Take the following example:

function doSomething(arg1, arg2) {
  function doSomethingElse(arg) {
    return process(arg);
  };  return doSomethingElse(arg1) + doSomethingElse(arg2);
}

Every time we run doSomething , the nested function doSomethingElse is created from scratch. Again, closures provide a solution. If we return a function, doSomethingElse remains private but it will only be created once:

function doSomething(arg1, arg2) {
  function doSomethingElse(arg) {
    return process(arg);
  };  return (arg1, arg2) => doSomethingElse(arg1) + doSomethingElse(arg2);
}

5. Order Code to Minimise the Number of Operations

Benchmark: https://jsperf.com/choosing-the-best-order/1

Often, improvements to code speed can be improved if we think carefully about the order of actions in a function. Let’s imagine we’ve got an array of item prices, stored in cents, and we need a function to sum the items and return the result in dollars:

const cents = [2305, 4150, 5725, 2544, 1900];

The function has to do two things — convert cents to dollars and sum the elements — but the order of those actions is important. To convert to dollars first, we could use a function like this:

function sumCents(array) {
  return '

But, in this method, we perform a division operation on every item in our array. By putting our actions in the opposite order, we only have to perform a division once:


function sumCents(array) {
  return '

The key is to make sure that actions are being taken in the best possible order.


6. Learn Big O Notation

Learning about Big O Notation can be one of the best ways to understand why some functions run faster and take up less memory than others — especially at scale. For example, Big O Notation can be used to show, at a glance, why Binary Search is one of the most efficient search algorithms, and why Quicksort tends to be the most performant method for sorting through data. In essence, Big O Notation provides a way of better understanding and applying several of the speed optimisations discussed in this article so far. It’s a deep topic, so if you’re interested in finding out more, I recommend my article on Big-O Notation or my article where I discuss four different solutions to a Google Interview Question in the context of their time and space complexity.


A Formula 1 racing car.

A Formula 1 racing car.

Do it faster — photo by chuttersnap on Unsplash

Do It Faster

The biggest gains in code speed tend to come from the first two categories of optimisation: ‘Do It Less’ and ‘Do It Less Often’. In this section, we’ll look at a few ways to make your code faster that are more concerned with optimising the code you’ve got, rather than reducing it or making it run fewer times.

In reality, of course, even these optimisations involve reducing the size of your code — or making it more compiler-friendly, which reduces the size of the compiler code. But on the surface, you’re changing your code rather than removing it, and that’s why the following are logged under ‘Do It Faster’!

7. Prefer Built-In Methods

Benchmark: https://jsperf.com/prefer-built-in-methods/1

For those with experience of compilers and lower-level languages, this point may seem obvious. But as a general rule of them, if JavaScript has a built-in method, use it.

The compiler code is designed with performance optimisations specific to the method or object type. Plus, the underlying language is C++. Unless your use-case is extremely specific, the chance of your own JavaScript implementation outperforming existing methods is very low!

To test this, let’s create our own JavaScript implementation of the Array.prototype.map method:

function map(arr, func) {
  const mapArr = [];
  for(let i = 0; i < arr.length; i++) {
    const result = func(arr[i], i, arr);
    mapArr.push(result);
  }
  return mapArr;
}

Now, let’s create an array of 100 random integers between 1 and 100:

const arr = [...Array(100)].map(e=>~~(Math.random()*100));

Even if we want to perform a simple operation, like multiplying each integer in the array by 2, we will see performance differences:

map(arr, el => el * 2);  // Our JavaScript implementation
arr.map(el => el * 2);   // The built-in map method

In my tests, using our new JavaScript map function was roughly 65% slower than using Array.prototype.map . To view the source code of V8’s implementation of Array.prototype.map , click here. And to run these tests for yourself, check out the benchmark.

8. Use the Best Object for the Job

Benchmark 1: Adding values to a Set vs pushing to an array
Benchmark 2: 
Adding entries to a Map vs adding entries to a regular object

Similarly, the best possible performance also comes from choosing the most appropriate built-in object for the job at hand. JavaScript’s built-in objects go well-beyond the fundamental types: Numbers , Strings , Functions , Objects and so on. Used in the right context, many of these less common objects can offer significant performance advantages.

In other articles, I have written about how using Sets can be faster than using Arrays, and using Maps can be faster than using regular ObjectsSetsand Maps are keyed collections, and they can provide significant performance benefits in contexts where you are regularly adding and removing entries.

Get to know the built-in object types and try always to use the best object for your needs, as this can often lead to faster code.

9. Don’t Forget About Memory

As a high-level language, JavaScript takes care of a lot of lower-level details for you. One such detail is memory management. JavaScript uses a system known as garbage collection to free up memory that — as far as it is possible to tell without the explicit instructions from a developer — is no longer needed.

Though memory management is automatic in JavaScript, that doesn’t mean that it’s perfect. There are additional steps you can take to manage memory and reduce the chance of memory leaks.

For example, Sets and Maps also have ‘weak’ variants, known as WeakSetsand WeakMaps . These hold ‘weak’ references to objects. These are not enumerable, but they prevent memory leaks by making sure unreferenced values get garbage collected.

You can also have greater control over memory allocation by using JavaScript’s TypedArray objects, introduced in ES2017. For example, an Int8Array can take values between -128 and 127 , and has a size of just one byte. It’s worth noting, however, that the performance gains of using TypedArrays may be very small: comparing a regular array and a Uint32Array shows a minor improvement in write performance but little or no improvement in read performance (credits to Chris Khoo for these two tests).

Acquiring a basic understanding of a lower-level programming language can help you write better and faster JavaScript code. I write about this more in my article, What JavaScript Developers Can Learn from C++.

10. Use Monomorphic Forms Where Possible

Benchmark 1: Monomorphic vs polymorphic
Benchmark 2: 
One function argument vs two

If we set const a = 2 , then the variable a can be considered polymorphic (it can be changed). By contrast, if we were to use 2 directly, that can be considered monomorphic (its value is fixed).

Of course, setting variables is extremely useful if we need to use them multiple times. But if you only use a variable once, it’s slightly faster to avoid setting a variable at all. Take a simple multiplication function:

function multiply(x, y) {
  return x * y;
};

If we run multiply(2, 3) it’s about 1% faster than running:

let x = 2, y = 3;
multiply(x, y);

That’s a pretty small win. But across a large codebase, many small wins like this can add up.

Similarly, using arguments in functions provides flexibility at the expense of performance. Again, arguments are an integral part of programming. But if you don’t need them, you’ll gain a performance advantage by not using them. So, an even faster version of our multiply function would look like this:

function multiplyBy3(x) {
  return x * 3;
}

As above, the performance improvement is small (in my tests, roughly 2%). But if this kind of improvement could be made many times across a large codebase, it’s worth considering. As a rule, only introduce arguments when a value has to be dynamic and only introduce variables when they’re going to be used more than once.

11. Avoid the ‘Delete’ Keyword

Benchmark 1: Removing keys from an object vs setting them as undefined
Benchmark 2: 
The delete statement vs Map.prototype.delete

The delete keyword is used to remove an entry from an object. You may feel that it is necessary for your application, but if you can avoid using it, do. Behind the scenes, delete removes the benefits of the hidden class pattern in the V8 Javascript engine, making it a generic slow object, which — you guessed it — performs slower!

Depending on your needs, it may be sufficient simply to set the unwanted property as undefined:

const obj = { a: 1, b: 2, c: 3 };
obj.a = undefined;

I have seen suggestions on the web that it might be faster to create a copy of the original object without the specific property, using functions like the following:

const obj = { a: 1, b: 2, c: 3 };
const omit = (prop, { [prop]: _, ...rest }) => rest;
const newObj = omit('a', obj);

However, in my tests, the function above (and several others) proved even slower than the delete keyword. Plus, functions like this are less readable than delete obj.a or obj.a = undefined .

As an alternative, consider whether you could use a Map instead of an object, as Map.prototype.delete is much faster than the delete statement.


An old clock with Roman numerals, attached to the outside of a shop.

An old clock with Roman numerals, attached to the outside of a shop.

Do it later — photo by Alexander Schimmeck on Unsplash

Do It Later

If you can’t do it less, do it less often or do it faster, then there’s a fourth category of optimisation you can use make your code feel faster — even if takes exactly the same amount of time to run. This involves restructuring your code in such a way that less integral or more demanding tasks don’t block the most important stuff.

12. Use Asynchronous Code to Prevent Thread Blocking

By default, JavaScript is single-threaded and runs its code synchronously, one-step-at-a-time. (Under the hood, browser code may be running multiple threads to capture events and trigger handlers, but — as far as writing JavaScript code is concerned — it’s single-threaded).

This works well for most JavaScript code, but if we have events likely to take a long time, we don’t want to block or delay the execution of more important code.

The solution is to use asynchronous code. This is mandatory for certain built-in methods like fetch() or XMLHttpRequest() , but it’s also worth noting that any synchronous function can be made asynchronous: if you have a time-consuming (synchronous) operation, such as performing operations on every item in a large array, this code can be made asynchronous so that it doesn’t block the execution of other code. If you’re new to asynchronous JavaScript, check out my article, A Guide to JavaScript Promises.

In addition, many modules like Node.js’s filesystem have asynchronous and synchronous variants of some of their functions, such as fs.writeFile()and fs.writeFileSync() . In normal circumstances, stick to the default asynchronous method.

13. Use Code Splitting

If you’re using JavaScript on the client-side, your priorities should be making sure that the visuals appear as quickly as possible. A key benchmark is ‘first contentful paint’, which measures the time from navigation to the time when the browser renders the first bit of content from the DOM.

One of the best ways to improve this is through JavaScript code-splitting. Instead of serving your JavaScript code in one large bundle, consider splitting it into smaller chunks, so that the minimum necessary JavaScript code is required upfront. How you go about code splitting will vary depending on whether you’re using ReactAngularVue or vanilla Javascript.

A related tactic is tree-shaking, which is a form of dead code elimination specifically focused on removing unused or unnecessary dependencies from your codebase. To find out more about this, I recommend this article from Google. (And remember to minify your code for production!)


Make sure to test your code — photo by Louis Reed on Unsplash

Conclusion

The best way to ensure you’re actually making useful optimisation to your code is to test them. Throughout this article, I’ve provided code benchmarks using https://jsperf.com/, but you could also check smaller sections of code using:

As for checking the performance of entire web applications, a great starting point is the network and performance section of Chrome’s Dev Tools. I also recommend Google’s Lighthouse extension.

Finally, though important, speed isn’t the be-all and end-all of good code. Readability and maintainability are extremely important too, and there’s rarely a good reason to make minor speed improvements if that leads to more time spent finding and fixing bugs.

If you’re a newer developer, I hope this opened your eyes to some of the performance-boosting techniques at your disposal. And if you’re more experienced, I hope this article was a useful refresher.

Got any performance tips that I’ve missed? Let me know in the comments!

Credit @Medium

+ array.map(el => el / 100).reduce((x, y) => x + y);
}

But, in this method, we perform a division operation on every item in our array. By putting our actions in the opposite order, we only have to perform a division once:

The key is to make sure that actions are being taken in the best possible order.

6. Learn Big O Notation

Learning about Big O Notation can be one of the best ways to understand why some functions run faster and take up less memory than others — especially at scale. For example, Big O Notation can be used to show, at a glance, why Binary Search is one of the most efficient search algorithms, and why Quicksort tends to be the most performant method for sorting through data.

In essence, Big O Notation provides a way of better understanding and applying several of the speed optimisations discussed in this article so far. It’s a deep topic, so if you’re interested in finding out more, I recommend my article on Big-O Notation or my article where I discuss four different solutions to a Google Interview Question in the context of their time and space complexity.


A Formula 1 racing car.

A Formula 1 racing car.

Do it faster — photo by chuttersnap on Unsplash

Do It Faster

The biggest gains in code speed tend to come from the first two categories of optimisation: ‘Do It Less’ and ‘Do It Less Often’. In this section, we’ll look at a few ways to make your code faster that are more concerned with optimising the code you’ve got, rather than reducing it or making it run fewer times.

In reality, of course, even these optimisations involve reducing the size of your code — or making it more compiler-friendly, which reduces the size of the compiler code. But on the surface, you’re changing your code rather than removing it, and that’s why the following are logged under ‘Do It Faster’!

7. Prefer Built-In Methods

Benchmark: https://jsperf.com/prefer-built-in-methods/1

For those with experience of compilers and lower-level languages, this point may seem obvious. But as a general rule of them, if JavaScript has a built-in method, use it.

The compiler code is designed with performance optimisations specific to the method or object type. Plus, the underlying language is C++. Unless your use-case is extremely specific, the chance of your own JavaScript implementation outperforming existing methods is very low!

To test this, let’s create our own JavaScript implementation of the Array.prototype.map method:

Now, let’s create an array of 100 random integers between 1 and 100:

Even if we want to perform a simple operation, like multiplying each integer in the array by 2, we will see performance differences:

In my tests, using our new JavaScript map function was roughly 65% slower than using Array.prototype.map . To view the source code of V8’s implementation of Array.prototype.map , click here. And to run these tests for yourself, check out the benchmark.

8. Use the Best Object for the Job

Benchmark 1: Adding values to a Set vs pushing to an array
Benchmark 2: 
Adding entries to a Map vs adding entries to a regular object

Similarly, the best possible performance also comes from choosing the most appropriate built-in object for the job at hand. JavaScript’s built-in objects go well-beyond the fundamental types: Numbers , Strings , Functions , Objects and so on. Used in the right context, many of these less common objects can offer significant performance advantages.

In other articles, I have written about how using Sets can be faster than using Arrays, and using Maps can be faster than using regular ObjectsSetsand Maps are keyed collections, and they can provide significant performance benefits in contexts where you are regularly adding and removing entries.

Get to know the built-in object types and try always to use the best object for your needs, as this can often lead to faster code.

9. Don’t Forget About Memory

As a high-level language, JavaScript takes care of a lot of lower-level details for you. One such detail is memory management. JavaScript uses a system known as garbage collection to free up memory that — as far as it is possible to tell without the explicit instructions from a developer — is no longer needed.

Though memory management is automatic in JavaScript, that doesn’t mean that it’s perfect. There are additional steps you can take to manage memory and reduce the chance of memory leaks.

For example, Sets and Maps also have ‘weak’ variants, known as WeakSetsand WeakMaps . These hold ‘weak’ references to objects. These are not enumerable, but they prevent memory leaks by making sure unreferenced values get garbage collected.

You can also have greater control over memory allocation by using JavaScript’s TypedArray objects, introduced in ES2017. For example, an Int8Array can take values between -128 and 127 , and has a size of just one byte. It’s worth noting, however, that the performance gains of using TypedArrays may be very small: comparing a regular array and a Uint32Array shows a minor improvement in write performance but little or no improvement in read performance (credits to Chris Khoo for these two tests).

Acquiring a basic understanding of a lower-level programming language can help you write better and faster JavaScript code. I write about this more in my article, What JavaScript Developers Can Learn from C++.

10. Use Monomorphic Forms Where Possible

Benchmark 1: Monomorphic vs polymorphic
Benchmark 2: 
One function argument vs two

If we set const a = 2 , then the variable a can be considered polymorphic (it can be changed). By contrast, if we were to use 2 directly, that can be considered monomorphic (its value is fixed).

Of course, setting variables is extremely useful if we need to use them multiple times. But if you only use a variable once, it’s slightly faster to avoid setting a variable at all. Take a simple multiplication function:

If we run multiply(2, 3) it’s about 1% faster than running:

That’s a pretty small win. But across a large codebase, many small wins like this can add up.

Similarly, using arguments in functions provides flexibility at the expense of performance. Again, arguments are an integral part of programming. But if you don’t need them, you’ll gain a performance advantage by not using them. So, an even faster version of our multiply function would look like this:

As above, the performance improvement is small (in my tests, roughly 2%). But if this kind of improvement could be made many times across a large codebase, it’s worth considering. As a rule, only introduce arguments when a value has to be dynamic and only introduce variables when they’re going to be used more than once.

11. Avoid the ‘Delete’ Keyword

Benchmark 1: Removing keys from an object vs setting them as undefined
Benchmark 2: 
The delete statement vs Map.prototype.delete

The delete keyword is used to remove an entry from an object. You may feel that it is necessary for your application, but if you can avoid using it, do. Behind the scenes, delete removes the benefits of the hidden class pattern in the V8 Javascript engine, making it a generic slow object, which — you guessed it — performs slower!

Depending on your needs, it may be sufficient simply to set the unwanted property as undefined:

I have seen suggestions on the web that it might be faster to create a copy of the original object without the specific property, using functions like the following:

However, in my tests, the function above (and several others) proved even slower than the delete keyword. Plus, functions like this are less readable than delete obj.a or obj.a = undefined .

As an alternative, consider whether you could use a Map instead of an object, as Map.prototype.delete is much faster than the delete statement.


An old clock with Roman numerals, attached to the outside of a shop.

An old clock with Roman numerals, attached to the outside of a shop.

Do it later — photo by Alexander Schimmeck on Unsplash

Do It Later

If you can’t do it less, do it less often or do it faster, then there’s a fourth category of optimisation you can use make your code feel faster — even if takes exactly the same amount of time to run. This involves restructuring your code in such a way that less integral or more demanding tasks don’t block the most important stuff.

12. Use Asynchronous Code to Prevent Thread Blocking

By default, JavaScript is single-threaded and runs its code synchronously, one-step-at-a-time. (Under the hood, browser code may be running multiple threads to capture events and trigger handlers, but — as far as writing JavaScript code is concerned — it’s single-threaded).

This works well for most JavaScript code, but if we have events likely to take a long time, we don’t want to block or delay the execution of more important code.

The solution is to use asynchronous code. This is mandatory for certain built-in methods like fetch() or XMLHttpRequest() , but it’s also worth noting that any synchronous function can be made asynchronous: if you have a time-consuming (synchronous) operation, such as performing operations on every item in a large array, this code can be made asynchronous so that it doesn’t block the execution of other code. If you’re new to asynchronous JavaScript, check out my article, A Guide to JavaScript Promises.

In addition, many modules like Node.js’s filesystem have asynchronous and synchronous variants of some of their functions, such as fs.writeFile()and fs.writeFileSync() . In normal circumstances, stick to the default asynchronous method.

13. Use Code Splitting

If you’re using JavaScript on the client-side, your priorities should be making sure that the visuals appear as quickly as possible. A key benchmark is ‘first contentful paint’, which measures the time from navigation to the time when the browser renders the first bit of content from the DOM.

One of the best ways to improve this is through JavaScript code-splitting. Instead of serving your JavaScript code in one large bundle, consider splitting it into smaller chunks, so that the minimum necessary JavaScript code is required upfront. How you go about code splitting will vary depending on whether you’re using ReactAngularVue or vanilla Javascript.

A related tactic is tree-shaking, which is a form of dead code elimination specifically focused on removing unused or unnecessary dependencies from your codebase. To find out more about this, I recommend this article from Google. (And remember to minify your code for production!)


Make sure to test your code — photo by Louis Reed on Unsplash

Conclusion

The best way to ensure you’re actually making useful optimisation to your code is to test them. Throughout this article, I’ve provided code benchmarks using https://jsperf.com/, but you could also check smaller sections of code using:

As for checking the performance of entire web applications, a great starting point is the network and performance section of Chrome’s Dev Tools. I also recommend Google’s Lighthouse extension.

Finally, though important, speed isn’t the be-all and end-all of good code. Readability and maintainability are extremely important too, and there’s rarely a good reason to make minor speed improvements if that leads to more time spent finding and fixing bugs.

If you’re a newer developer, I hope this opened your eyes to some of the performance-boosting techniques at your disposal. And if you’re more experienced, I hope this article was a useful refresher.

Got any performance tips that I’ve missed? Let me know in the comments!

Credit @Medium

+ array.reduce((x, y) => x + y) / 100;
}

The key is to make sure that actions are being taken in the best possible order.

6. Learn Big O Notation

Learning about Big O Notation can be one of the best ways to understand why some functions run faster and take up less memory than others — especially at scale. For example, Big O Notation can be used to show, at a glance, why Binary Search is one of the most efficient search algorithms, and why Quicksort tends to be the most performant method for sorting through data.

In essence, Big O Notation provides a way of better understanding and applying several of the speed optimisations discussed in this article so far. It’s a deep topic, so if you’re interested in finding out more, I recommend my article on Big-O Notation or my article where I discuss four different solutions to a Google Interview Question in the context of their time and space complexity.


A Formula 1 racing car.

A Formula 1 racing car.

Do it faster — photo by chuttersnap on Unsplash

Do It Faster

The biggest gains in code speed tend to come from the first two categories of optimisation: ‘Do It Less’ and ‘Do It Less Often’. In this section, we’ll look at a few ways to make your code faster that are more concerned with optimising the code you’ve got, rather than reducing it or making it run fewer times.

In reality, of course, even these optimisations involve reducing the size of your code — or making it more compiler-friendly, which reduces the size of the compiler code. But on the surface, you’re changing your code rather than removing it, and that’s why the following are logged under ‘Do It Faster’!

7. Prefer Built-In Methods

Benchmark: https://jsperf.com/prefer-built-in-methods/1

For those with experience of compilers and lower-level languages, this point may seem obvious. But as a general rule of them, if JavaScript has a built-in method, use it.

The compiler code is designed with performance optimisations specific to the method or object type. Plus, the underlying language is C++. Unless your use-case is extremely specific, the chance of your own JavaScript implementation outperforming existing methods is very low!

To test this, let’s create our own JavaScript implementation of the Array.prototype.map method:

Now, let’s create an array of 100 random integers between 1 and 100:

Even if we want to perform a simple operation, like multiplying each integer in the array by 2, we will see performance differences:

In my tests, using our new JavaScript map function was roughly 65% slower than using Array.prototype.map . To view the source code of V8’s implementation of Array.prototype.map , click here. And to run these tests for yourself, check out the benchmark.

8. Use the Best Object for the Job

Benchmark 1: Adding values to a Set vs pushing to an array
Benchmark 2: 
Adding entries to a Map vs adding entries to a regular object

Similarly, the best possible performance also comes from choosing the most appropriate built-in object for the job at hand. JavaScript’s built-in objects go well-beyond the fundamental types: Numbers , Strings , Functions , Objects and so on. Used in the right context, many of these less common objects can offer significant performance advantages.

In other articles, I have written about how using Sets can be faster than using Arrays, and using Maps can be faster than using regular ObjectsSetsand Maps are keyed collections, and they can provide significant performance benefits in contexts where you are regularly adding and removing entries.

Get to know the built-in object types and try always to use the best object for your needs, as this can often lead to faster code.

9. Don’t Forget About Memory

As a high-level language, JavaScript takes care of a lot of lower-level details for you. One such detail is memory management. JavaScript uses a system known as garbage collection to free up memory that — as far as it is possible to tell without the explicit instructions from a developer — is no longer needed.

Though memory management is automatic in JavaScript, that doesn’t mean that it’s perfect. There are additional steps you can take to manage memory and reduce the chance of memory leaks.

For example, Sets and Maps also have ‘weak’ variants, known as WeakSetsand WeakMaps . These hold ‘weak’ references to objects. These are not enumerable, but they prevent memory leaks by making sure unreferenced values get garbage collected.

You can also have greater control over memory allocation by using JavaScript’s TypedArray objects, introduced in ES2017. For example, an Int8Array can take values between -128 and 127 , and has a size of just one byte. It’s worth noting, however, that the performance gains of using TypedArrays may be very small: comparing a regular array and a Uint32Array shows a minor improvement in write performance but little or no improvement in read performance (credits to Chris Khoo for these two tests).

Acquiring a basic understanding of a lower-level programming language can help you write better and faster JavaScript code. I write about this more in my article, What JavaScript Developers Can Learn from C++.

10. Use Monomorphic Forms Where Possible

Benchmark 1: Monomorphic vs polymorphic
Benchmark 2: 
One function argument vs two

If we set const a = 2 , then the variable a can be considered polymorphic (it can be changed). By contrast, if we were to use 2 directly, that can be considered monomorphic (its value is fixed).

Of course, setting variables is extremely useful if we need to use them multiple times. But if you only use a variable once, it’s slightly faster to avoid setting a variable at all. Take a simple multiplication function:

If we run multiply(2, 3) it’s about 1% faster than running:

That’s a pretty small win. But across a large codebase, many small wins like this can add up.

Similarly, using arguments in functions provides flexibility at the expense of performance. Again, arguments are an integral part of programming. But if you don’t need them, you’ll gain a performance advantage by not using them. So, an even faster version of our multiply function would look like this:

As above, the performance improvement is small (in my tests, roughly 2%). But if this kind of improvement could be made many times across a large codebase, it’s worth considering. As a rule, only introduce arguments when a value has to be dynamic and only introduce variables when they’re going to be used more than once.

11. Avoid the ‘Delete’ Keyword

Benchmark 1: Removing keys from an object vs setting them as undefined
Benchmark 2: 
The delete statement vs Map.prototype.delete

The delete keyword is used to remove an entry from an object. You may feel that it is necessary for your application, but if you can avoid using it, do. Behind the scenes, delete removes the benefits of the hidden class pattern in the V8 Javascript engine, making it a generic slow object, which — you guessed it — performs slower!

Depending on your needs, it may be sufficient simply to set the unwanted property as undefined:

I have seen suggestions on the web that it might be faster to create a copy of the original object without the specific property, using functions like the following:

However, in my tests, the function above (and several others) proved even slower than the delete keyword. Plus, functions like this are less readable than delete obj.a or obj.a = undefined .

As an alternative, consider whether you could use a Map instead of an object, as Map.prototype.delete is much faster than the delete statement.


An old clock with Roman numerals, attached to the outside of a shop.

An old clock with Roman numerals, attached to the outside of a shop.

Do it later — photo by Alexander Schimmeck on Unsplash

Do It Later

If you can’t do it less, do it less often or do it faster, then there’s a fourth category of optimisation you can use make your code feel faster — even if takes exactly the same amount of time to run. This involves restructuring your code in such a way that less integral or more demanding tasks don’t block the most important stuff.

12. Use Asynchronous Code to Prevent Thread Blocking

By default, JavaScript is single-threaded and runs its code synchronously, one-step-at-a-time. (Under the hood, browser code may be running multiple threads to capture events and trigger handlers, but — as far as writing JavaScript code is concerned — it’s single-threaded).

This works well for most JavaScript code, but if we have events likely to take a long time, we don’t want to block or delay the execution of more important code.

The solution is to use asynchronous code. This is mandatory for certain built-in methods like fetch() or XMLHttpRequest() , but it’s also worth noting that any synchronous function can be made asynchronous: if you have a time-consuming (synchronous) operation, such as performing operations on every item in a large array, this code can be made asynchronous so that it doesn’t block the execution of other code. If you’re new to asynchronous JavaScript, check out my article, A Guide to JavaScript Promises.

In addition, many modules like Node.js’s filesystem have asynchronous and synchronous variants of some of their functions, such as fs.writeFile()and fs.writeFileSync() . In normal circumstances, stick to the default asynchronous method.

13. Use Code Splitting

If you’re using JavaScript on the client-side, your priorities should be making sure that the visuals appear as quickly as possible. A key benchmark is ‘first contentful paint’, which measures the time from navigation to the time when the browser renders the first bit of content from the DOM.

One of the best ways to improve this is through JavaScript code-splitting. Instead of serving your JavaScript code in one large bundle, consider splitting it into smaller chunks, so that the minimum necessary JavaScript code is required upfront. How you go about code splitting will vary depending on whether you’re using ReactAngularVue or vanilla Javascript.

A related tactic is tree-shaking, which is a form of dead code elimination specifically focused on removing unused or unnecessary dependencies from your codebase. To find out more about this, I recommend this article from Google. (And remember to minify your code for production!)


Make sure to test your code — photo by Louis Reed on Unsplash

Conclusion

The best way to ensure you’re actually making useful optimisation to your code is to test them. Throughout this article, I’ve provided code benchmarks using https://jsperf.com/, but you could also check smaller sections of code using:

As for checking the performance of entire web applications, a great starting point is the network and performance section of Chrome’s Dev Tools. I also recommend Google’s Lighthouse extension.

Finally, though important, speed isn’t the be-all and end-all of good code. Readability and maintainability are extremely important too, and there’s rarely a good reason to make minor speed improvements if that leads to more time spent finding and fixing bugs.

If you’re a newer developer, I hope this opened your eyes to some of the performance-boosting techniques at your disposal. And if you’re more experienced, I hope this article was a useful refresher.

Got any performance tips that I’ve missed? Let me know in the comments!

Credit @Medium

+ array.map(el => el / 100).reduce((x, y) => x + y);
}

But, in this method, we perform a division operation on every item in our array. By putting our actions in the opposite order, we only have to perform a division once:

The key is to make sure that actions are being taken in the best possible order.

6. Learn Big O Notation

Learning about Big O Notation can be one of the best ways to understand why some functions run faster and take up less memory than others — especially at scale. For example, Big O Notation can be used to show, at a glance, why Binary Search is one of the most efficient search algorithms, and why Quicksort tends to be the most performant method for sorting through data.

In essence, Big O Notation provides a way of better understanding and applying several of the speed optimisations discussed in this article so far. It’s a deep topic, so if you’re interested in finding out more, I recommend my article on Big-O Notation or my article where I discuss four different solutions to a Google Interview Question in the context of their time and space complexity.


A Formula 1 racing car.

A Formula 1 racing car.

Do it faster — photo by chuttersnap on Unsplash

Do It Faster

The biggest gains in code speed tend to come from the first two categories of optimisation: ‘Do It Less’ and ‘Do It Less Often’. In this section, we’ll look at a few ways to make your code faster that are more concerned with optimising the code you’ve got, rather than reducing it or making it run fewer times.

In reality, of course, even these optimisations involve reducing the size of your code — or making it more compiler-friendly, which reduces the size of the compiler code. But on the surface, you’re changing your code rather than removing it, and that’s why the following are logged under ‘Do It Faster’!

7. Prefer Built-In Methods

Benchmark: https://jsperf.com/prefer-built-in-methods/1

For those with experience of compilers and lower-level languages, this point may seem obvious. But as a general rule of them, if JavaScript has a built-in method, use it.

The compiler code is designed with performance optimisations specific to the method or object type. Plus, the underlying language is C++. Unless your use-case is extremely specific, the chance of your own JavaScript implementation outperforming existing methods is very low!

To test this, let’s create our own JavaScript implementation of the Array.prototype.map method:

Now, let’s create an array of 100 random integers between 1 and 100:

Even if we want to perform a simple operation, like multiplying each integer in the array by 2, we will see performance differences:

In my tests, using our new JavaScript map function was roughly 65% slower than using Array.prototype.map . To view the source code of V8’s implementation of Array.prototype.map , click here. And to run these tests for yourself, check out the benchmark.

8. Use the Best Object for the Job

Benchmark 1: Adding values to a Set vs pushing to an array
Benchmark 2: 
Adding entries to a Map vs adding entries to a regular object

Similarly, the best possible performance also comes from choosing the most appropriate built-in object for the job at hand. JavaScript’s built-in objects go well-beyond the fundamental types: Numbers , Strings , Functions , Objects and so on. Used in the right context, many of these less common objects can offer significant performance advantages.

In other articles, I have written about how using Sets can be faster than using Arrays, and using Maps can be faster than using regular ObjectsSetsand Maps are keyed collections, and they can provide significant performance benefits in contexts where you are regularly adding and removing entries.

Get to know the built-in object types and try always to use the best object for your needs, as this can often lead to faster code.

9. Don’t Forget About Memory

As a high-level language, JavaScript takes care of a lot of lower-level details for you. One such detail is memory management. JavaScript uses a system known as garbage collection to free up memory that — as far as it is possible to tell without the explicit instructions from a developer — is no longer needed.

Though memory management is automatic in JavaScript, that doesn’t mean that it’s perfect. There are additional steps you can take to manage memory and reduce the chance of memory leaks.

For example, Sets and Maps also have ‘weak’ variants, known as WeakSetsand WeakMaps . These hold ‘weak’ references to objects. These are not enumerable, but they prevent memory leaks by making sure unreferenced values get garbage collected.

You can also have greater control over memory allocation by using JavaScript’s TypedArray objects, introduced in ES2017. For example, an Int8Array can take values between -128 and 127 , and has a size of just one byte. It’s worth noting, however, that the performance gains of using TypedArrays may be very small: comparing a regular array and a Uint32Array shows a minor improvement in write performance but little or no improvement in read performance (credits to Chris Khoo for these two tests).

Acquiring a basic understanding of a lower-level programming language can help you write better and faster JavaScript code. I write about this more in my article, What JavaScript Developers Can Learn from C++.

10. Use Monomorphic Forms Where Possible

Benchmark 1: Monomorphic vs polymorphic
Benchmark 2: 
One function argument vs two

If we set const a = 2 , then the variable a can be considered polymorphic (it can be changed). By contrast, if we were to use 2 directly, that can be considered monomorphic (its value is fixed).

Of course, setting variables is extremely useful if we need to use them multiple times. But if you only use a variable once, it’s slightly faster to avoid setting a variable at all. Take a simple multiplication function:

If we run multiply(2, 3) it’s about 1% faster than running:

That’s a pretty small win. But across a large codebase, many small wins like this can add up.

Similarly, using arguments in functions provides flexibility at the expense of performance. Again, arguments are an integral part of programming. But if you don’t need them, you’ll gain a performance advantage by not using them. So, an even faster version of our multiply function would look like this:

As above, the performance improvement is small (in my tests, roughly 2%). But if this kind of improvement could be made many times across a large codebase, it’s worth considering. As a rule, only introduce arguments when a value has to be dynamic and only introduce variables when they’re going to be used more than once.

11. Avoid the ‘Delete’ Keyword

Benchmark 1: Removing keys from an object vs setting them as undefined
Benchmark 2: 
The delete statement vs Map.prototype.delete

The delete keyword is used to remove an entry from an object. You may feel that it is necessary for your application, but if you can avoid using it, do. Behind the scenes, delete removes the benefits of the hidden class pattern in the V8 Javascript engine, making it a generic slow object, which — you guessed it — performs slower!

Depending on your needs, it may be sufficient simply to set the unwanted property as undefined:

I have seen suggestions on the web that it might be faster to create a copy of the original object without the specific property, using functions like the following:

However, in my tests, the function above (and several others) proved even slower than the delete keyword. Plus, functions like this are less readable than delete obj.a or obj.a = undefined .

As an alternative, consider whether you could use a Map instead of an object, as Map.prototype.delete is much faster than the delete statement.


An old clock with Roman numerals, attached to the outside of a shop.

An old clock with Roman numerals, attached to the outside of a shop.

Do it later — photo by Alexander Schimmeck on Unsplash

Do It Later

If you can’t do it less, do it less often or do it faster, then there’s a fourth category of optimisation you can use make your code feel faster — even if takes exactly the same amount of time to run. This involves restructuring your code in such a way that less integral or more demanding tasks don’t block the most important stuff.

12. Use Asynchronous Code to Prevent Thread Blocking

By default, JavaScript is single-threaded and runs its code synchronously, one-step-at-a-time. (Under the hood, browser code may be running multiple threads to capture events and trigger handlers, but — as far as writing JavaScript code is concerned — it’s single-threaded).

This works well for most JavaScript code, but if we have events likely to take a long time, we don’t want to block or delay the execution of more important code.

The solution is to use asynchronous code. This is mandatory for certain built-in methods like fetch() or XMLHttpRequest() , but it’s also worth noting that any synchronous function can be made asynchronous: if you have a time-consuming (synchronous) operation, such as performing operations on every item in a large array, this code can be made asynchronous so that it doesn’t block the execution of other code. If you’re new to asynchronous JavaScript, check out my article, A Guide to JavaScript Promises.

In addition, many modules like Node.js’s filesystem have asynchronous and synchronous variants of some of their functions, such as fs.writeFile()and fs.writeFileSync() . In normal circumstances, stick to the default asynchronous method.

13. Use Code Splitting

If you’re using JavaScript on the client-side, your priorities should be making sure that the visuals appear as quickly as possible. A key benchmark is ‘first contentful paint’, which measures the time from navigation to the time when the browser renders the first bit of content from the DOM.

One of the best ways to improve this is through JavaScript code-splitting. Instead of serving your JavaScript code in one large bundle, consider splitting it into smaller chunks, so that the minimum necessary JavaScript code is required upfront. How you go about code splitting will vary depending on whether you’re using ReactAngularVue or vanilla Javascript.

A related tactic is tree-shaking, which is a form of dead code elimination specifically focused on removing unused or unnecessary dependencies from your codebase. To find out more about this, I recommend this article from Google. (And remember to minify your code for production!)


Make sure to test your code — photo by Louis Reed on Unsplash

Conclusion

The best way to ensure you’re actually making useful optimisation to your code is to test them. Throughout this article, I’ve provided code benchmarks using https://jsperf.com/, but you could also check smaller sections of code using:

As for checking the performance of entire web applications, a great starting point is the network and performance section of Chrome’s Dev Tools. I also recommend Google’s Lighthouse extension.

Finally, though important, speed isn’t the be-all and end-all of good code. Readability and maintainability are extremely important too, and there’s rarely a good reason to make minor speed improvements if that leads to more time spent finding and fixing bugs.

If you’re a newer developer, I hope this opened your eyes to some of the performance-boosting techniques at your disposal. And if you’re more experienced, I hope this article was a useful refresher.

Got any performance tips that I’ve missed? Let me know in the comments!

Credit @Medium

[Codester] – GeekBlog – HTML5 Web Development Design Blog Theme – Freebies Download

[Codester] – GeekBlog – HTML5 Web Development Design Blog Theme – Freebies Download

A HTML5 Theme for Web Development, Design and Related Blogs.

Live Preview Screenshot

A theme best suited for blog sites about web development, design, tech and others. But can be used for any subject.

Features

  • HTML, CSS, and JS Files Included
  • Files Commented Clearly
  • Fully Responsive
  • Clean & Modern Design
  • Browser Compatibility
  • W3C Valid Markup
  • Easy to Customize

Requirements

  • HTML5 Theme only requires a current updated browser for proper viewing and editing, Notepad++ is recommended for examining the markup.
Monitoring Linux Logs with Kibana and Rsyslog

Monitoring Linux Logs with Kibana and Rsyslog

Monitoring Linux Logs with Kibana and Rsyslog

This tutorial details how to build a monitoring pipeline to analyze Linux logs with ELK 7.2 and Rsyslog.

If you are a system administrator, or even a curious application developer, there is a high chance that you are regularly digging into your logs to find precious information in them.

Sometimes you may want to monitor SSH intrusions on your VMs.

Sometimes, you might want to see what errors were raised by your application server on a certain day, on a very specific hour. Or you may want to have some insights about who stopped your systemd service on one of your VMs.

If you pictured yourself in one of those points, you are probably on the right tutorial.

In this tutorial, we are to build a complete log monitoring pipeline using the ELK stack (ElasticSearch, Logstash and Kibana) and Rsyslog as a powerful syslog server.

Before going any further, and jumping into technical considerations right away, let’s have a talk about why do we want to monitor Linux logs with Kibana.

I – Why should you monitor Linux logs?

Monitoring Linux logs is crucial and every DevOps engineer should know how to do it. Here’s why :

  • You have real-time visual feedback about your logs : probably one of the key aspects of log monitoring, you can build meaningful visualizations (such as datatables, pies, graphs or aggregated bar charts) to give some meaning to your logs.
  • You are able to aggregate information to build advanced and more complex dashboards : sometimes raw information is not enough, you may want to join it with other logs or to compare it with other logs to identify a trend. A visualization platform with expression handling lets you perform that.
  • You can quickly filter for a certain term, or given a certain time period : if you are only interested in SSH logs, you can build a targeted dashboard for it.
  • Logs are navigable in a quick and elegant way : I know the pain of tailing and greping your logs files endlessly. I’d rather have a platform for it.

II – What You Will Learn

There are many things that you are going to learn if you follow this tutorial:

  • How logs are handled on a Linux system (Ubuntu or Debian) and what rsyslog is.
  • How to install the ELK stack (ElasticSearch 7.2, Logstash and Kibana) and what those tools will be used for.
  • How to configure rsyslog to forward logs to Logstash
  • How to configure Logstash for log ingestion and ElasticSearch storage.
  • How to play with Kibana to build our final visualization dashboard.

The prerequisites for this tutorial are as follows :

  • You have a Linux system with rsyslog installed. You either have a standalone machine with rsyslog, or a centralized logging system.
  • You have administrator rights or you have enough rights to install new packages on your Linux system.

Without further due, let’s jump into it!

III – What does a log monitoring architecture looks like?

a – Key concepts of Linux logging

Before detailing how our log monitoring architecture looks like, let’s go back in time for a second.

Historically, Linux logging starts with syslog.

Syslog is a protocol developed in 1980 which aims at standardizing the way logs are formatted, not only for Linux, but for any system exchanging logs.

From there, syslog servers were developed and were embedded with the capability of handling syslog messages.

They rapidly evolved to functionalities such as filtering, having content routing abilities, or probably one of the key features of such servers : storing logs and rotating them.

Rsyslog was developed keeping this key functionality in mind : having a modular and customizable way to handle logs.

The modularity would be handled with modules and the customization with log templates.

In a way, rsyslog can ingest logs from many different sources and it can forward them to an even wider set of destinations. This is what we are going to use in our tutorial.

b – Building a log monitoring architecture

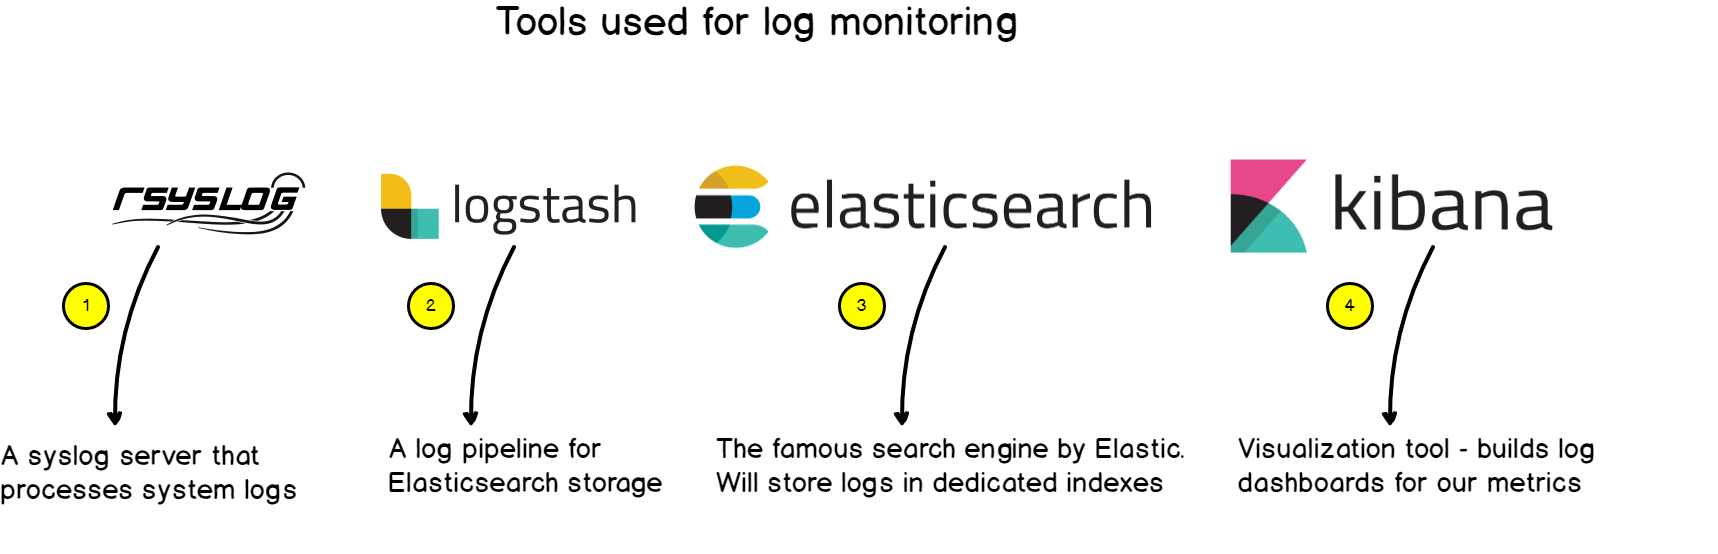
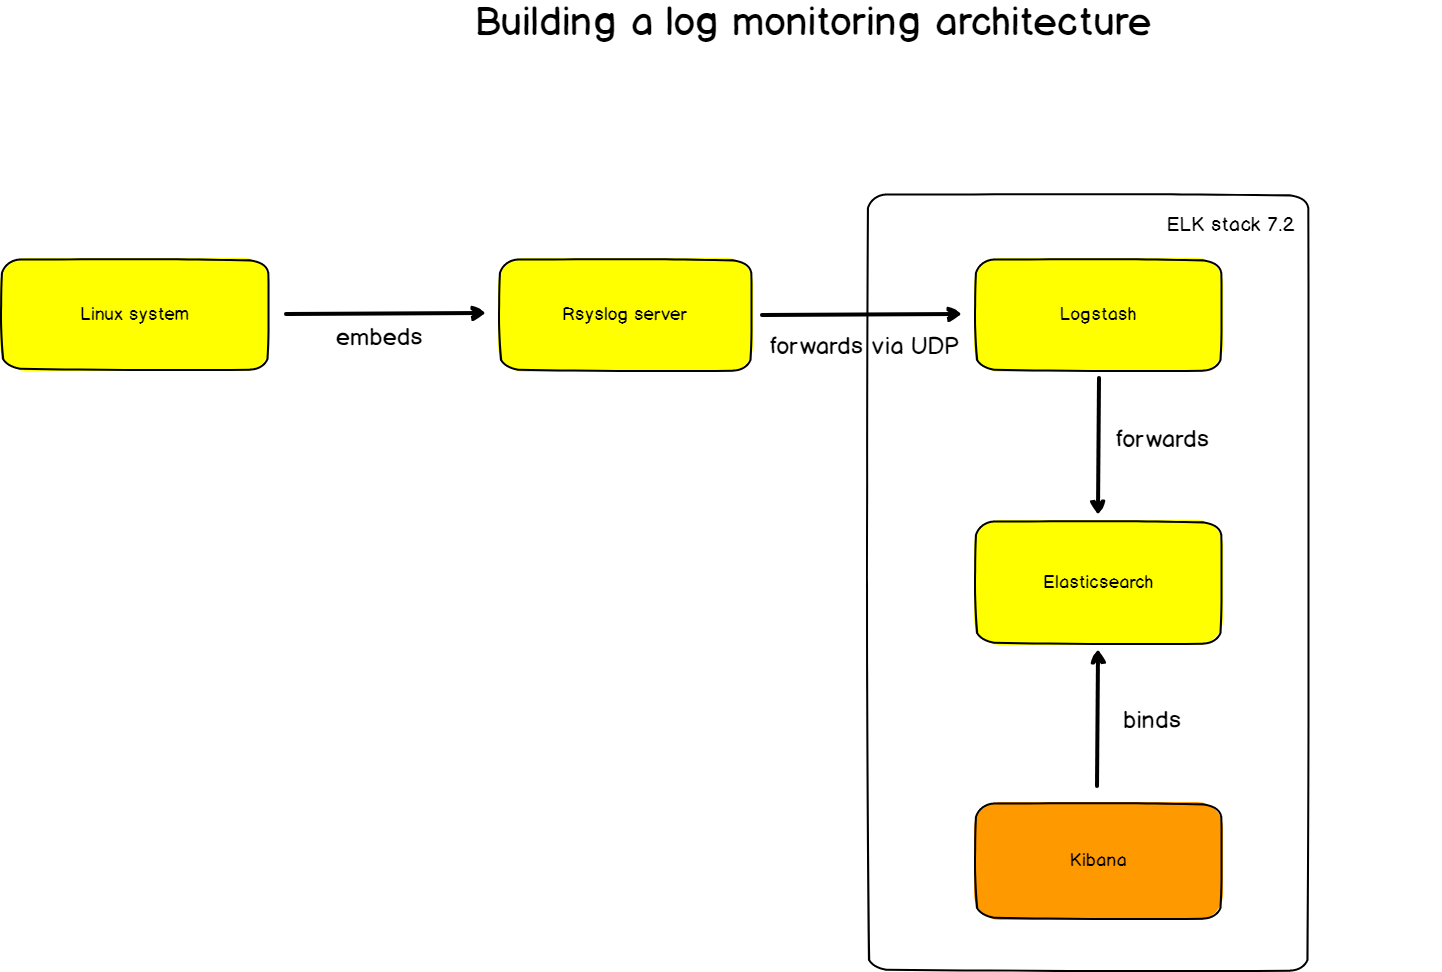
Here’s the final architecture that we are going to use for this tutorial.

  • rsyslog : used as an advancement syslog server, rsyslog will forward logs to Logstash in the RFC 5424 format we described before.
  • Logstash : part of the ELK stack, Logstash will transform logs from the syslog format to JSON. As a reminder, ElasticSearch takes JSON as an input.
  • ElasticSearch : the famous search engine will store logs in a dedicated log index (logstash-*). ElasticSearch will naturally index the logs and make them available for analyzing.
  • Kibana : used as an exploration and visualization platform, Kibana will host our final dashboard.

Now that we know in which direction we are heading, let’s install the different tools needed.

IV – Installing The Different Tools

a – Installing Java on Ubuntu

Before installing the ELK stack, you need to install Java on your computer.

To do so, run the following command:

$ sudo apt-get install default-jre

At the time of this tutorial, this instance runs the OpenJDK version 11.

ubuntu:~$ java -version
openjdk version "11.0.3" 2019-04-16
OpenJDK Runtime Environment (build 11.0.3+7-Ubuntu-1ubuntu218.04.1)
OpenJDK 64-Bit Server VM (build 11.0.3+7-Ubuntu-1ubuntu218.04.1, mixed mode, sharing)

b – Adding Elastic packages to your instance

For this tutorial, I am going to use a Ubuntu machine but details will be given for Debian ones.

First, add the GPG key to your APT repository.

$ wget -qO - https://artifacts.elastic.co/GPG-KEY-elasticsearch | sudo apt-key add -

Then, you can add Elastic source to your APT source list file.

$ echo "deb https://artifacts.elastic.co/packages/7.x/apt stable main" | sudo tee -a /etc/apt/sources.list.d/elastic-7.x.list

$ cat /etc/apt/sources.list.d/elastic-7.x.list
deb https://artifacts.elastic.co/packages/7.x/apt stable main

$ sudo apt-get update

From there, you should be ready to install every tool in the ELK stack.

Let’s start with ElasticSearch.

c – Installing ElasticSearch

ElasticSearch is a search engine built by Elastic that stores data in indexes for very fast retrieval.

To install it, run the following command:

$ sudo apt-get install elasticsearch

The following command will automatically :

  • Download the deb package for ElasticSearch;
  • Create an elasticsearch user;
  • Create an elasticsearch group;
  • Automatically create a systemd service fully configured (inactive by default)

On first start, the service is inactive, start it and make sure that everything is running smoothly.

$ sudo systemctl start elasticsearch
● elasticsearch.service - Elasticsearch
   Loaded: loaded (/usr/lib/systemd/system/elasticsearch.service; disabled; vendor preset: enabled)
   Active: active (running) since Mon 2019-07-08 18:19:45 UTC; 2 days ago
     Docs: http://www.elastic.co

In order to make sure that ElasticSearch is actually running, you can execute one of those two commands:

  • Watching which applications listen on a targeted port
$ sudo lsof -i -P -n | grep LISTEN | grep 9200
java      10667   elasticsearch  212u  IPv6 1159208890      0t0  TCP [::1]:9200 (LISTEN)
java      10667   elasticsearch  213u  IPv6 1159208891      0t0  TCP 127.0.0.1:9200 (LISTEN)
  • Executing a simple ElasticSearch query
$ curl -XGET 'http://localhost:9200/_all/_search?q=*&pretty'

Your ElasticSearch instance is all set!

Now, let’s install Logstash as our log collection and filtering tool.

d – Installing Logstash

If you added Elastic packages previously, installing Logstash is as simple as executing:

$ sudo apt-get install logstash

Again, a Logstash service will be created, and you need to activate it.

$ sudo systemctl status logstash
$ sudo systemctl start logstash

By default, Logstash listens for metrics on port 9600. As we did before, list the open ports on your computer looking for that specific port.

$ sudo lsof -i -P -n | grep LISTEN | grep 9600
java      28872        logstash   79u  IPv6 1160098941      0t0  TCP 127.0.0.1:9600 (LISTEN)

Great!

We only need to install Kibana for our entire setup to be complete.

e – Installing Kibana

As a reminder, Kibana is the visualization tool tailored for ElasticSearch and used to monitor our final logs.

Not very surprising, but here’s the command to install Kibana:

$ sudo apt-get install kibana

As usual, start the service and verify that it is working properly.

$ sudo systemctl start kibana
$ sudo lsof -i -P -n | grep LISTEN | grep 5601
node       7253          kibana   18u  IPv4 1159451844      0t0  TCP *:5601 (LISTEN)

Kibana Web UI is available on port 5601.

Head over to http://localhost:5601 with your browser and you should see the following screen.
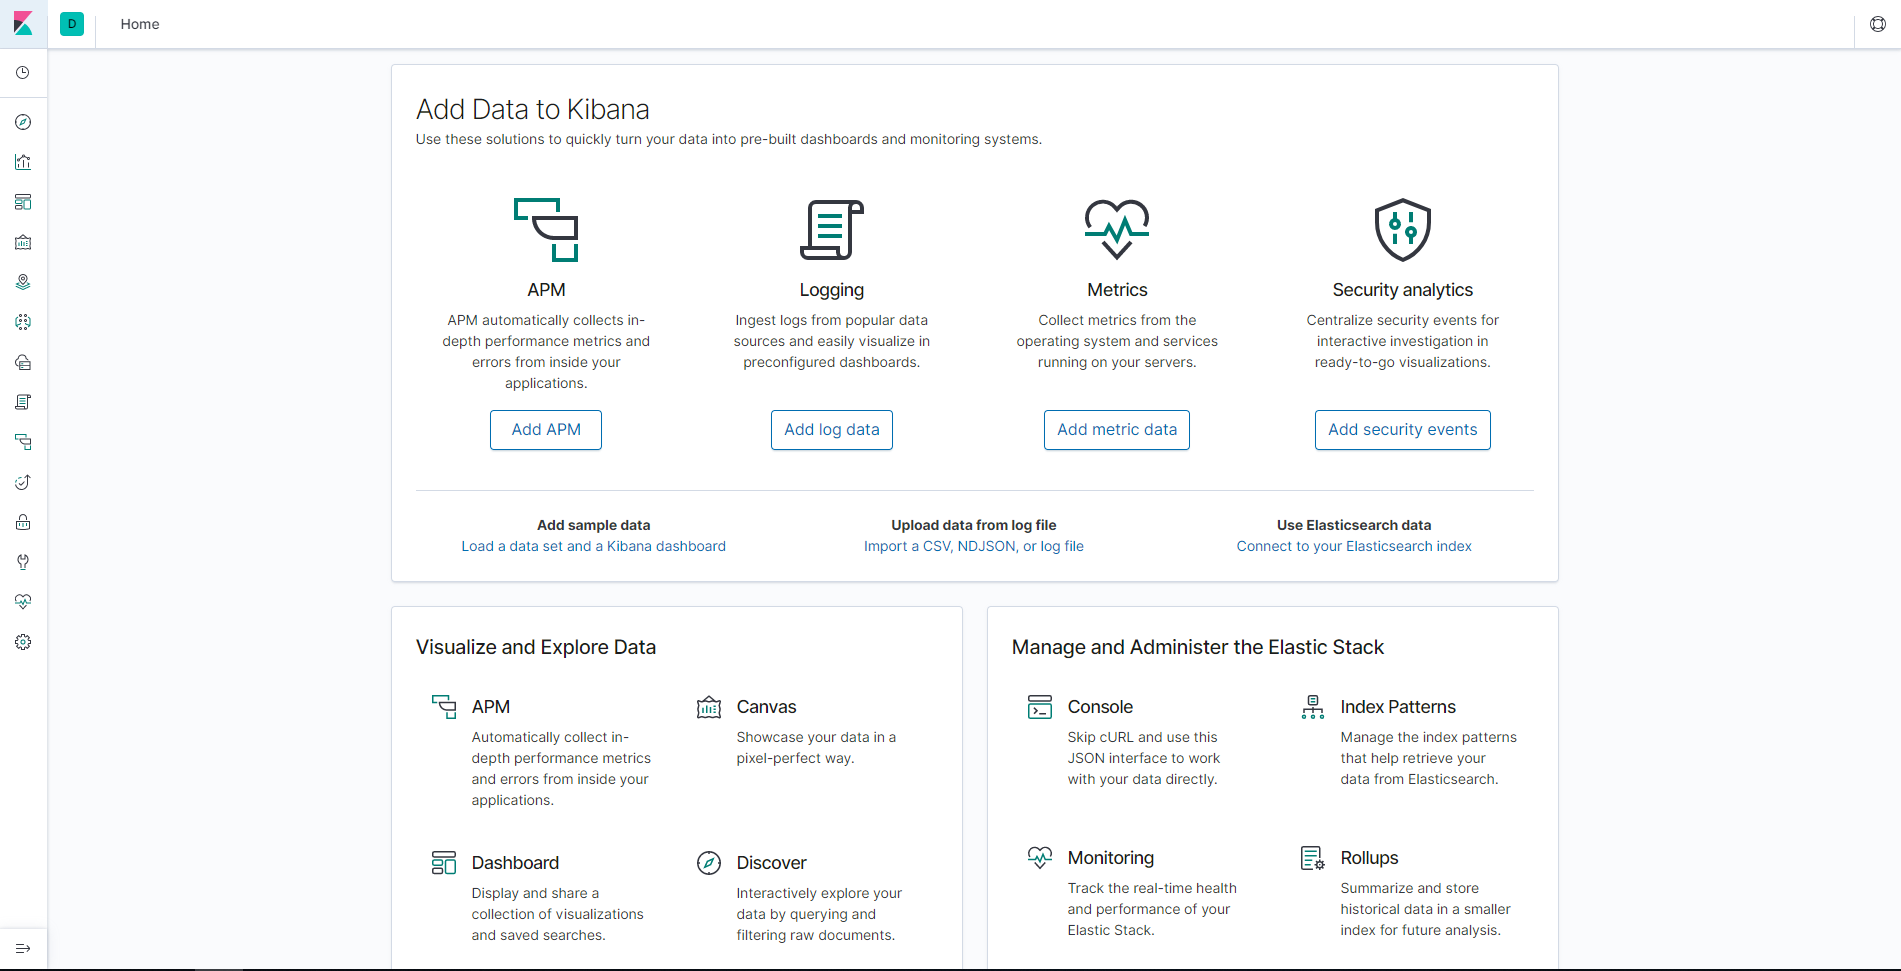
Nice!

We are now very ready to ingest logs from rsyslog and to start visualizing them in Kibana.

V – Routing Linux Logs to ElasticSearch

As a reminder, we are routing logs from rsyslog to Logstash and those logs will be transferred to ElasticSearch pretty much automatically.

a – Routing from Logstash to ElasticSearch

Before routing logs from rsyslog to Logstash, it is very important that we setup log forwarding between Logstash and ElasticSearch.

To do so, we are going to create a configuration file for Logstash and tell it exactly what to do.

To create Logstash configuration files, head over to /etc/logstash/conf.d and create a logstash.conf file.

Inside, append the following content:

input {                                                                                      
  udp {                                                                                      
    host => "127.0.0.1"                                                                      
    port => 10514                                                                            
    codec => "json"                                                                          
    type => "rsyslog"                                                                        
  }                                                                                          
}                                                                                            
                                                                                             
                                                                            
# The Filter pipeline stays empty here, no formatting is done.                                                                                           filter { }                                                                                   
                                                                                             
                   
# Every single log will be forwarded to ElasticSearch. If you are using another port, you should specify it here.                                                                                             
output {                                                                                     
  if [type] == "rsyslog" {                                                                   
    elasticsearch {                                                                          
      hosts => [ "127.0.0.1:9200" ]                                                          
    }                                                                                        
  }                                                                                          
}                                                                                            

Note : for this tutorial, we are using the UDP input for Logstash, but if you are looking for a more reliable way to transfer your logs, you should probably use the TCP input. The format is pretty much the same, just change the UDP line to TCP.

Restart your Logstash service.

$ sudo systemctl restart logstash

To verify that everything is running correctly, issue the following command:

$ netstat -na | grep 10514
udp        0      0 127.0.0.1:10514         0.0.0.0:*

Great!

Logstash is now listening on port 10514.

b – Routing from rsyslog to Logstash

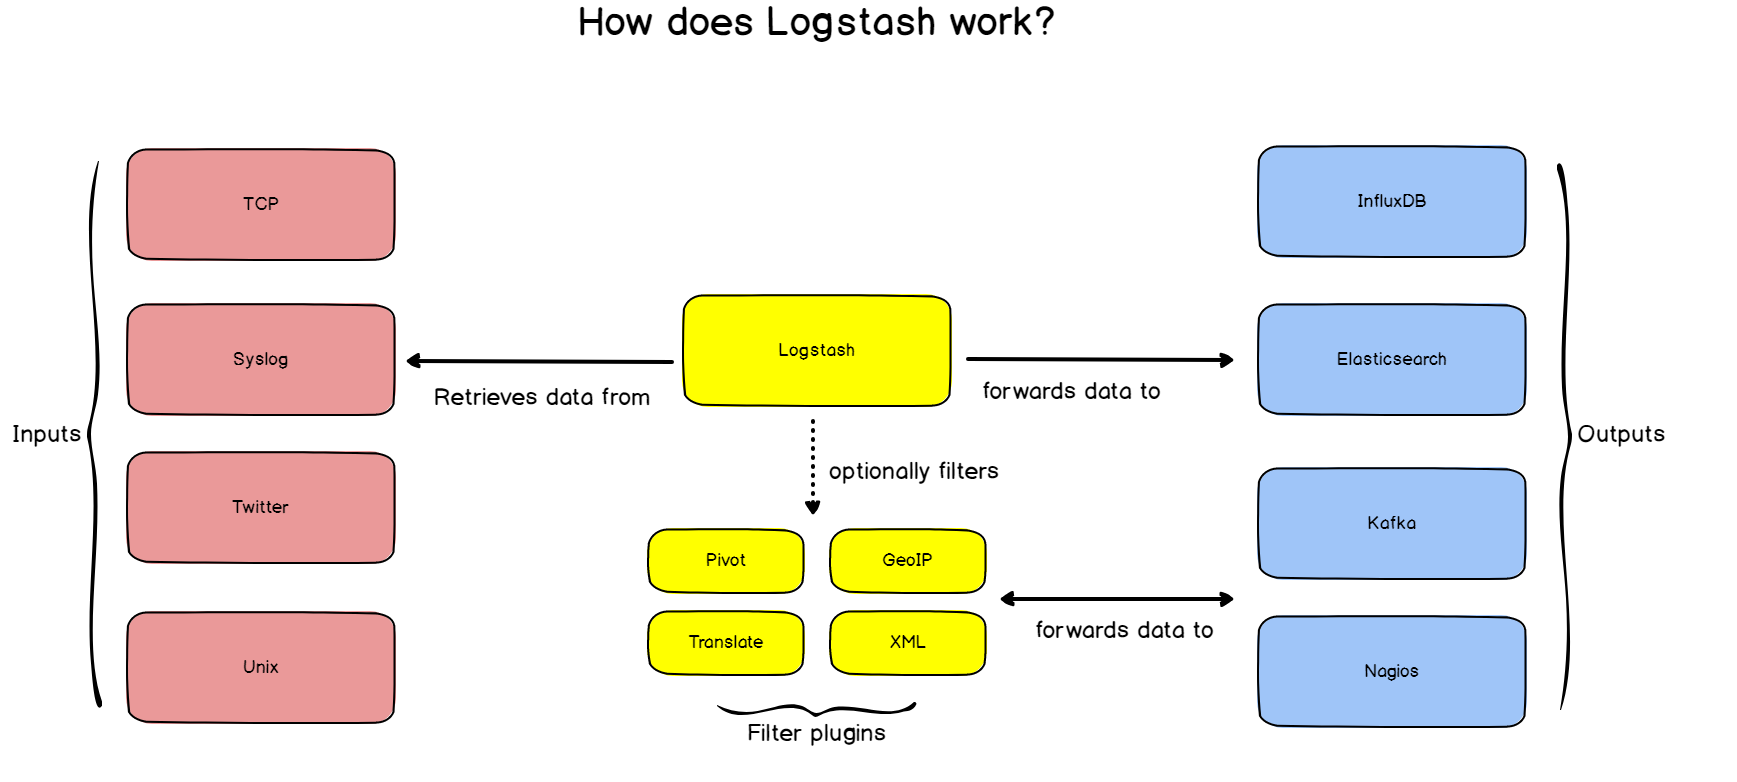
As described before, rsyslog has a set of different modules that allow it to transfer incoming logs to a wide set of destinations.

Rsyslog has the capacity to transform logs using templates. This is exactly what we are looking for as ElasticSearch expects JSON as an input, and not syslog RFC 5424 strings.

In order to forward logs in rsyslog, head over to /etc/rsyslog.d and create a new file named 70-output.conf

Inside your file, write the following content:

# This line sends all lines to defined IP address at port 10514
# using the json-template format.

*.*                         @127.0.0.1:10514;json-template

Now that you have log forwarding, create a 01-json-template.conf file in the same folder, and paste the following content:

template(name="json-template"
  type="list") {
    constant(value="{")
      constant(value="\"@timestamp\":\"")     property(name="timereported" dateFormat="rfc3339")
      constant(value="\",\"@version\":\"1")
      constant(value="\",\"message\":\"")     property(name="msg" format="json")
      constant(value="\",\"sysloghost\":\"")  property(name="hostname")
      constant(value="\",\"severity\":\"")    property(name="syslogseverity-text")
      constant(value="\",\"facility\":\"")    property(name="syslogfacility-text")
      constant(value="\",\"programname\":\"") property(name="programname")
      constant(value="\",\"procid\":\"")      property(name="procid")
    constant(value="\"}\n")
}

As you probably guessed it, for every incoming message, rsyslog will interpolate log properties into a JSON formatted message, and forward it to Logstash, listening on port 10514.

Restart your rsyslog service, and verify that logs are correctly forwarded to ElasticSearch.

Note : logs will be forwarded in an index called logstash-*.

$ sudo systemctl restart rsyslog
$ curl -XGET 'http://localhost:9200/logstash-*/_search?q=*&pretty'
{
  "took": 2,
  "timed_out": false,
  "_shards": {
    "total": 1,
    "successful": 1,
    "skipped": 0,
    "failed": 0
  },
  "hits": {
    "total": {
      "value": 10000,
      "relation": "gte"
    },
    "max_score": 1,
    "hits": [
      {
        "_index": "logstash-2019.07.08-000001",
        "_type": "_doc",
        "_id": "GEBK1WsBQwXNQFYwP8D_",
        "_score": 1,
        "_source": {
          "host": "127.0.0.1",
          "severity": "info",
          "programname": "memory_usage",
          "facility": "user",
          "@timestamp": "2019-07-09T05:52:21.402Z",
          "sysloghost": "schkn-ubuntu",
          "message": "                                  Dload  Upload   Total   Spent    Left  Speed",
          "@version": "1",
          "procid": "16780",
          "type": "rsyslog"
        }
      }
    ]
  }
}                                                                                             

Awesome! We know have rsyslog logs directly stored in ElasticSearch.

It is time for us to build our final dashboard in Kibana.

VI – Building a Log Dashboard in Kibana

This is where the fun begins.

We are going to build the dashboard shown in the first part and give meaning to the data we collected.

Similarly to our article on Linux process monitoring, this part is split according to the different panels of the final dashboard, so feel free to jump to the section you are interested in.

a – A Few Words On Kibana

Head over to Kibana (on http://localhost:5601), and you should see the following screen.

If it is your first time using Kibana, there is one little gotcha that I want to talk about that took me some time to understand.

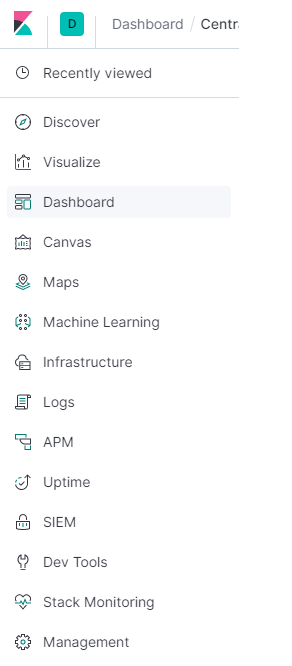
In order to create a dashboard, you will need to build visualizations. Kibana has two panels for this, one called “Visualize” and another called “Dashboard”

In order to create your dashboard, you will first create every individual visualization with the Visualize panel and save them.

When all of them will be created, you will import them one by one into your final dashboard.

Head over to the “Visualize” panel, and let’s start with one first panel.

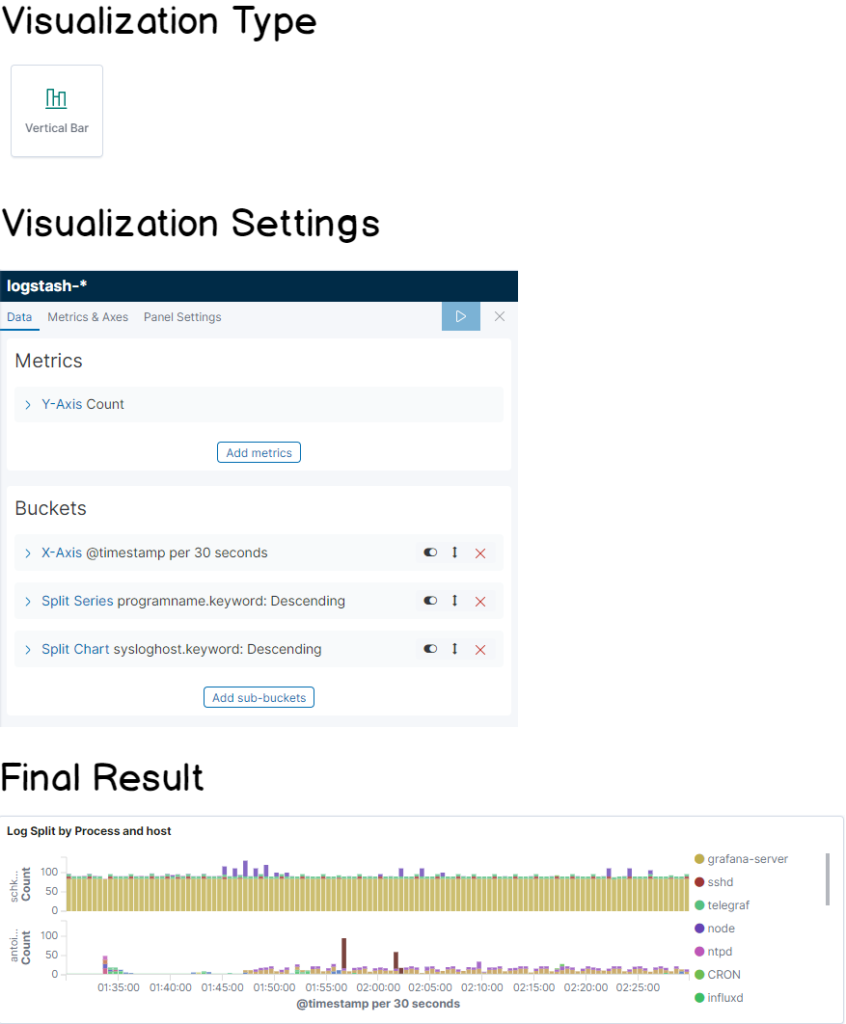
b – Aggregated bar chart for processes

To build your first dashboard, click on “Create new visualization” at the top right corner of Kibana. Choose a vertical bar panel.

The main goal is to build a panel that looks like this :

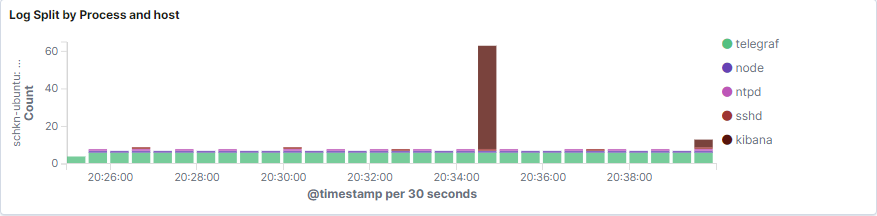
As you can see, the bar chart provides a total count of logs per processes, in an aggregated way.

The bar chart can also be split by host if you are working with multiple hosts.

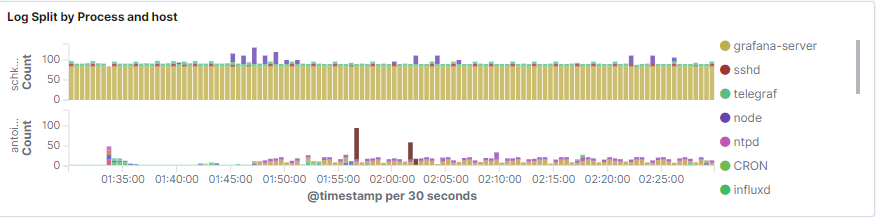
Without further ado, here’s the cheatsheet for this panel.

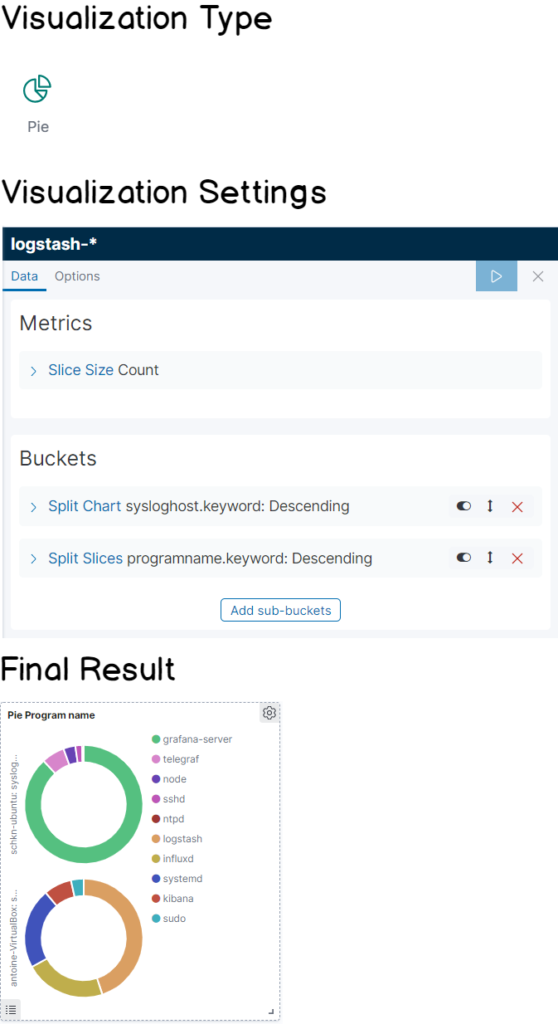
c – Pie by program name

Very similarly to what we have done before, the goal is to build a pie panel that divides the log proportions by program name.

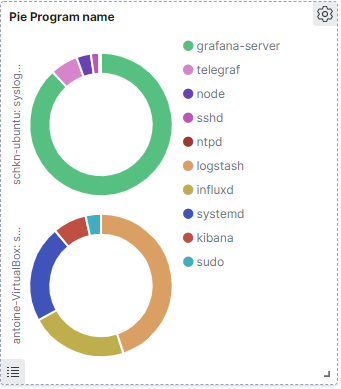
Here the cheatsheet for this panel!
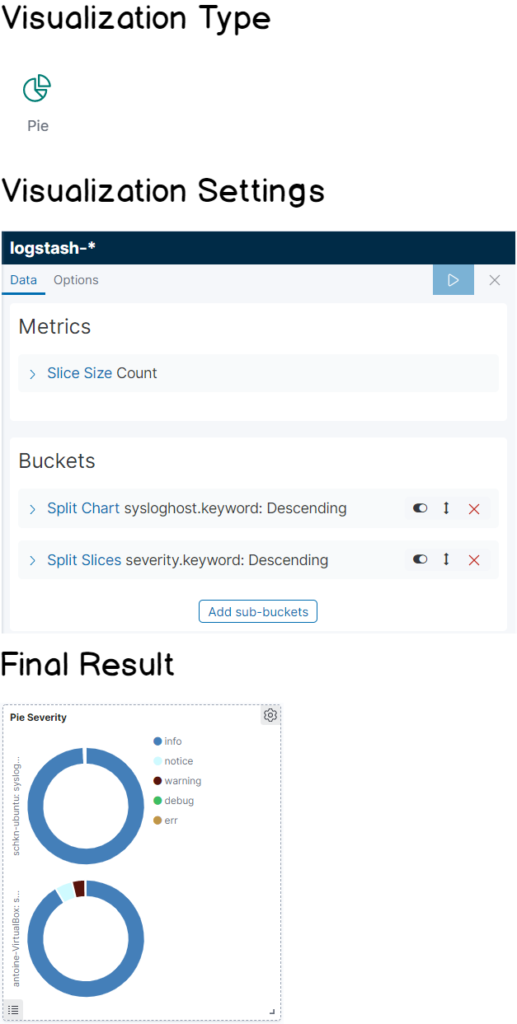
d – Pie by severity

This panel looks exactly like the one we did before, except that it splits logs by severity.

It can be quite useful when you have a major outage on one of your systems, and you want to quickly see that the number of errors is increasing very fast.

It also provides an easy way to see your log severity summary on a given period if you are interested for example in seeing what severities occur during the night or for particular events.

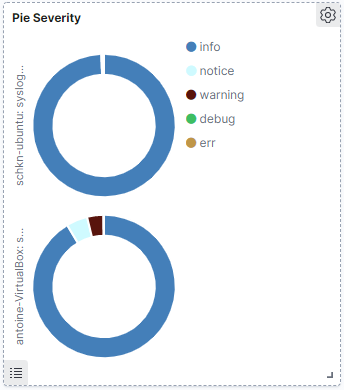
Again as you are probably waiting for it, here’s the cheatsheet for this panel!

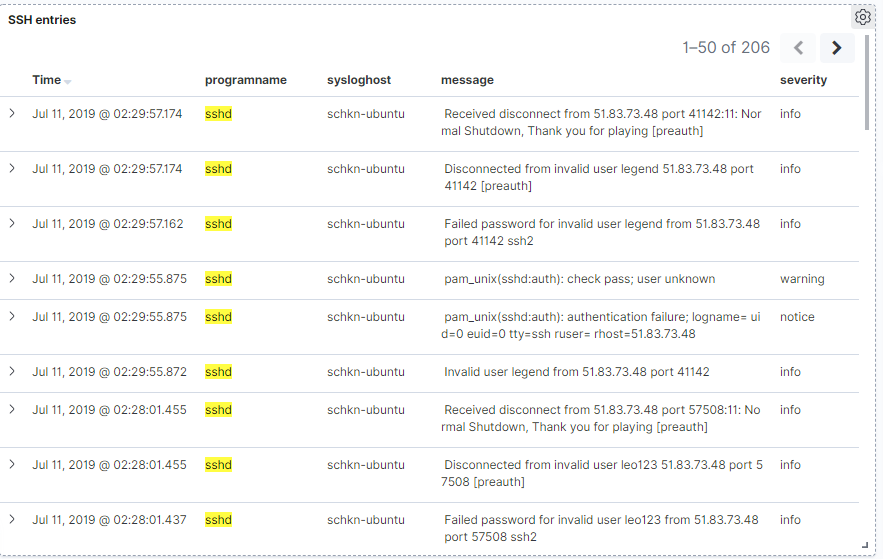
e – Monitoring SSH entries

This one is a little bit special, as you can directly go in the “Discover” tab in order to build your panel.

When entering the discover tab, your “logstash-*” should be automatically selected.

From there, in the filter bar, type the following filter “programname : ssh*”.

As you can see, you now have a direct access to every log related to the SSHd service on your machine. You can for example track illegal access attempts or wrong logins.

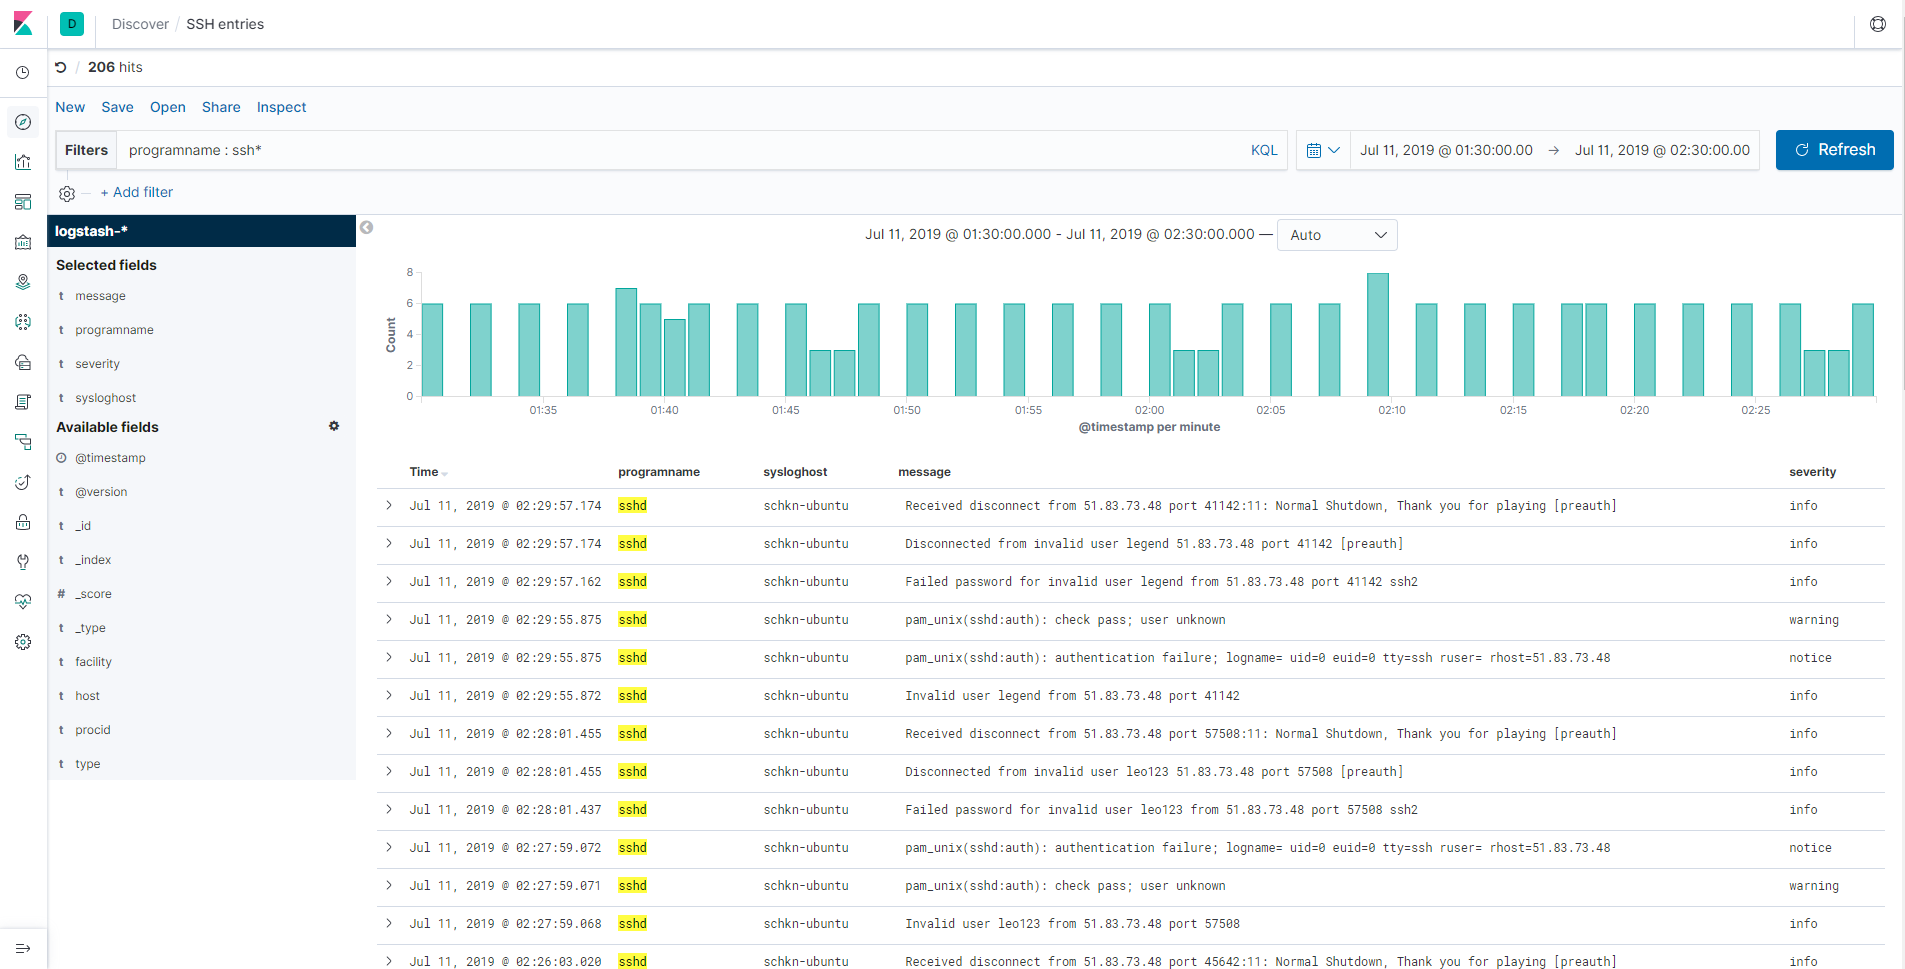
In order for it to be accessible in the dashboard panel, click on the “Save” option, and give a name to your panel.

Now in the dashboard panel, you can click on “Add”, and choose the panel you just created.

Nice! Now your panel is included into your dashboard, from the discover panel.

VII – Conclusion

With this tutorial, you know have a better understanding of how you can monitor your entire logging infrastructure easily with Rsyslog and the ELK stack.

With the architecture presented in this article, you can scale the log monitoring of an entire cluster very easily by forwarding logs to your central server.

One advice would be to use a Docker image for your rsyslog and ELK stack in order to be able to scale your centralized part (with Kubernetes for example) if the number of logs increases too much.

It is also important to note that this architecture is ideal if you choose to change the way your monitor logs in the future.

You can still rely on rsyslog for log centralizing, but you are free to change either the gateway (Logstash in this case), or the visualization tool.

It is important to note that you could use Grafana for example to monitor your Elasticsearch logs very easily.

With this tutorial, will you start using this architecture in your own infrastructure?

Do you think that other panels would be relevant for you to debug major outages on your systems?

If you have ideas, make sure to leave them below, so that it can help other engineers.

Until then, have fun, as always.

Credit @DevConnected.Com