
Understanding Asynchronous JavaScript – Learn How JavaScript Works
JavaScript is a single-threaded programming language which means only one thing can happen at a time. That is, the JavaScript engine can only process one statement at a time in a single thread.
While the single-threaded languages simplify writing code because you don’t have to worry about the concurrency issues, this also means you can’t perform long operations such as network access without blocking the main thread.
Imagine requesting some data from an API. Depending upon the situation the server might take some time to process the request while blocking the main thread making the web page unresponsive.
That’s where asynchronous JavaScript comes into play. Using asynchronous JavaScript (such as callbacks, promises, and async/await), you can perform long network requests without blocking the main thread.
While it’s not necessary that you learn all these concepts to be an awesome JavaScript developer, it’s helpful to know 🙂
So without further ado, Let’s get started 🙂
Tip: Using Bit you can turn any JS code into an API you can share, use and sync across projects and apps to build faster and reuse more code. Give it a try.
How Does Synchronous JavaScript Work?
Before we dive into asynchronous JavaScript, let’s first understand how the synchronous JavaScript code executes inside the JavaScript engine. For example:
const second = () => {
  console.log('Hello there!');
}const first = () => {
  console.log('Hi there!');
  second();
  console.log('The End');
}first();
To understand how the above code executes inside the JavaScript engine, we have to understand the concept of the execution context and the call stack (also known as execution stack).
Execution Context
An Execution Context is an abstract concept of an environment where the JavaScript code is evaluated and executed. Whenever any code is run in JavaScript, it’s run inside an execution context.
The function code executes inside the function execution context, and the global code executes inside the global execution context. Each function has its own execution context.
Call Stack
The call stack as its name implies is a stack with a LIFO (Last in, First out) structure, which is used to store all the execution context created during the code execution.
JavaScript has a single call stack because it’s a single-threaded programming language. The call stack has a LIFO structure which means that the items can be added or removed from the top of the stack only.
Let’s get back to the above code snippet and try to understand how the code executes inside the JavaScript engine.
const second = () => {
  console.log('Hello there!');
}const first = () => {
  console.log('Hi there!');
  second();
  console.log('The End');
}first();
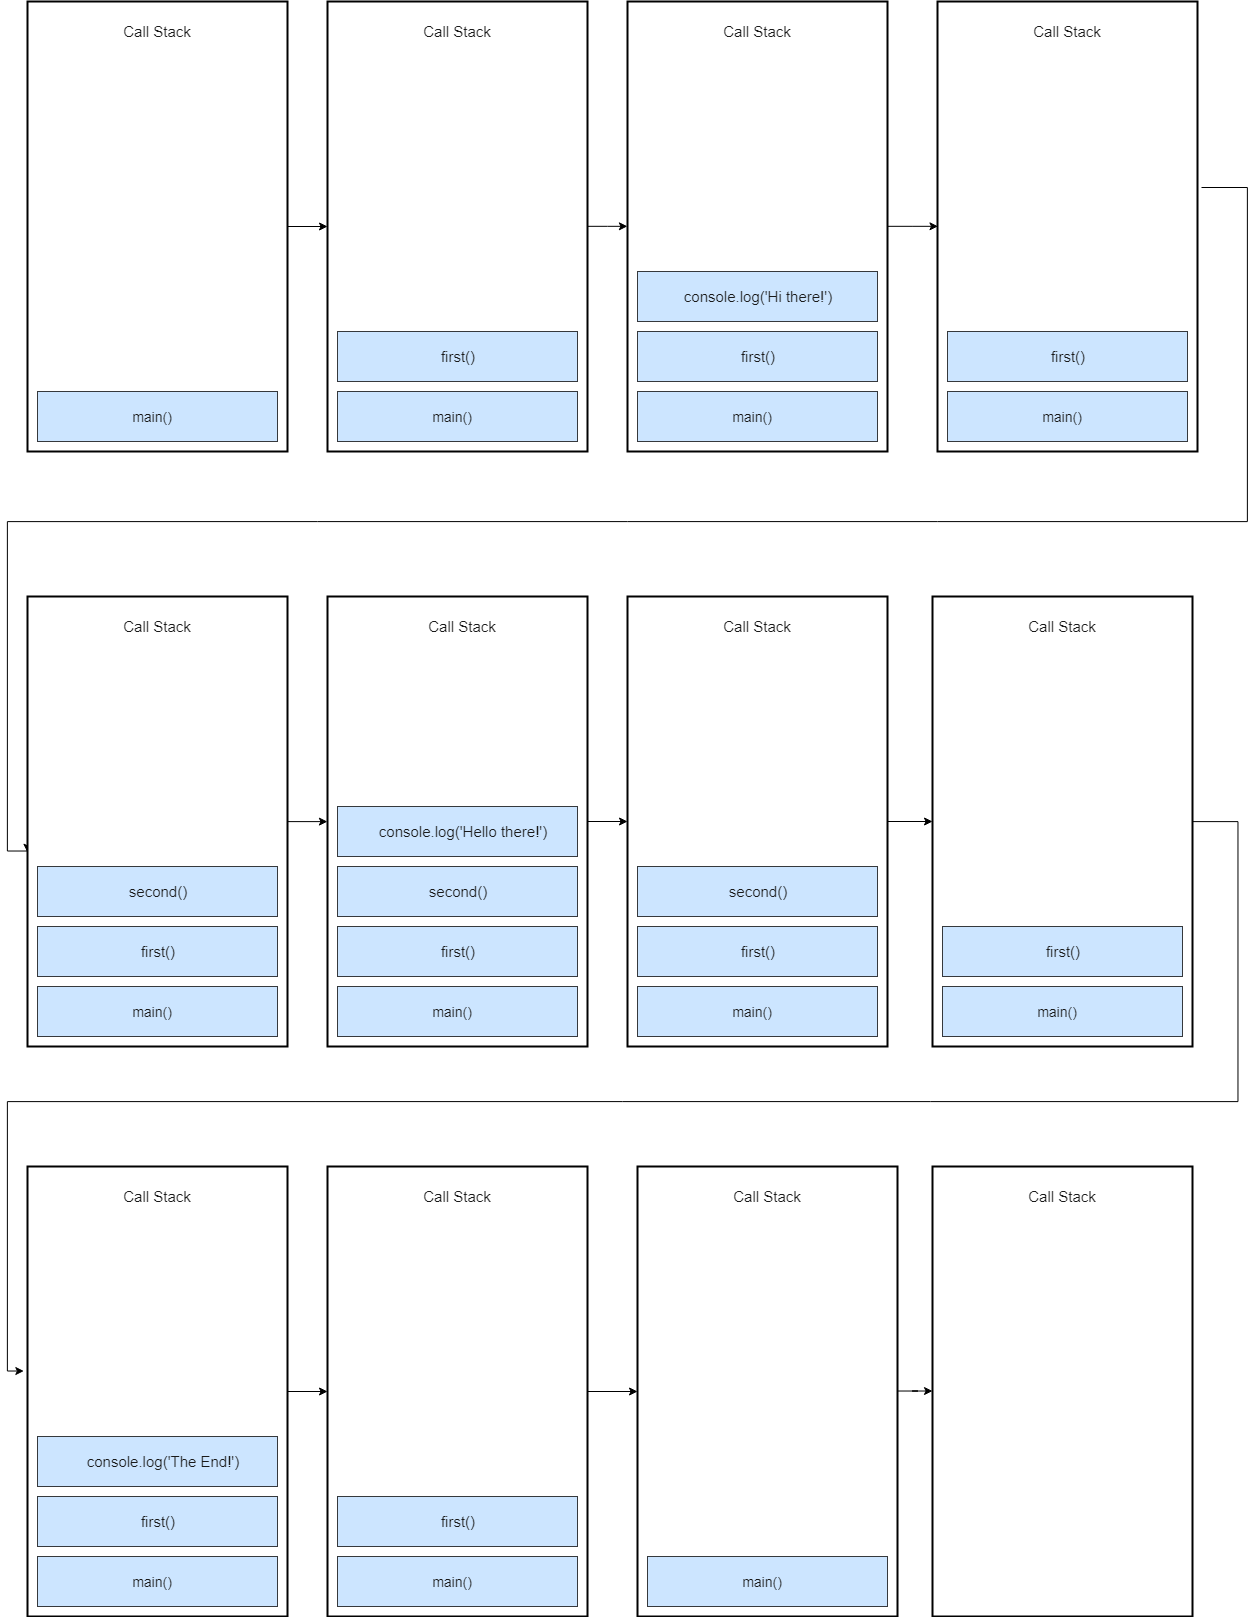
So What’s Happening Here?
When this code is executed, a global execution context is created (represented by main()) and pushed to the top of the call stack. When a call to first() is encountered, it’s pushed to the top of the stack.
Next, console.log('Hi there!') is pushed to the top of the stack, when it finishes, it’s popped off from the stack. After it, we call second(), so the second() function is pushed to the top of the stack.
console.log('Hello there!') is pushed to the top of the stack and popped off the stack when it finishes. The second() function finishes, so it’s popped off the stack.
console.log(‘The End’) is pushed to the top of the stack and removed when it finishes. After it, the first() function completes, so it’s removed from the stack.
The program completes its execution at this point, so the global execution context(main()) is popped off from the stack.
How Does Asynchronous JavaScript Work?
Now that we have a basic idea about the call stack, and how the synchronous JavaScript works, let’s get back to the asynchronous JavaScript.
What is Blocking?
Let’s suppose we are doing an image processing or a network request in a synchronous way. For example:
const processImage = (image) => {
  /**
  * doing some operations on image
  **/
  console.log('Image processed');
}const networkRequest = (url) => {
  /**
  * requesting network resource
  **/
  return someData;
}const greeting = () => {
  console.log('Hello World');
}processImage(logo.jpg);
networkRequest('www.somerandomurl.com');
greeting();
Doing image processing and network request takes time. So when processImage() function is called, it’s going to take some time depending on the size of the image.
When the processImage() function completes, it’s removed from the stack. After that the networkRequest() function is called and pushed to the stack. Again it’s also going to take some time to finish execution.
At last when the networkRequest() function completes, greeting() function is called and since it contains only a console.log statement and console.log statements are generally fast, so the greeting() function is immediately executed and returned.
So you see, we have to wait until the function (such as processImage() or networkRequest()) has finished. This means these functions are blocking the call stack or main thread. So we can’t perform any other operation while the above code is executing which is not ideal.
So what’s the solution?
The simplest solution is asynchronous callbacks. We use asynchronous callbacks to make our code non-blocking. For example:
const networkRequest = () => {
  setTimeout(() => {
    console.log('Async Code');
  }, 2000);
};console.log('Hello World');networkRequest();
Here I have used setTimeout method to simulate the network request. Please keep in mind that the setTimeout is not a part of the JavaScript engine, it’s a part of something known as web APIs (in browsers) and C/C++ APIs (in node.js).
To understand how this code is executed we have to understand a few more concepts such event loop and the callback queue (also known as task queue or the message queue).
The event loop, the web APIs and the message queue/task queue are not part of the JavaScript engine, it’s a part of browser’s JavaScript runtime environment or Nodejs JavaScript runtime environment (in case of Nodejs). In Nodejs, the web APIs are replaced by the C/C++ APIs.
Now let’s get back to the above code and see how it’s executed in an asynchronous way.
const networkRequest = () => {
  setTimeout(() => {
    console.log('Async Code');
  }, 2000);
};console.log('Hello World');networkRequest();console.log('The End');
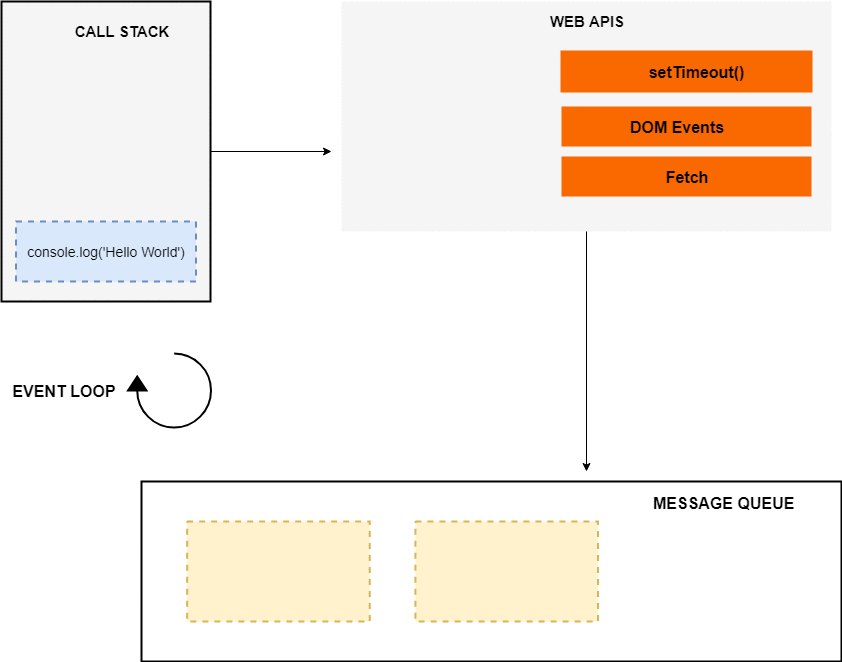
When the above code loads in the browser, the console.log(‘Hello World’) is pushed to the stack and popped off the stack after it’s finished. Next, a call to networkRequest() is encountered, so it’s pushed to the top of the stack.
Next setTimeout() function is called, so it’s pushed to the top of the stack. The setTimeout() has two arguments: 1) callback and 2) time in milliseconds (ms).
The setTimeout() method starts a timer of 2s in the web APIs environment. At this point, the setTimeout() has finished and it’s popped off from the stack. After it, console.log('The End') is pushed to the stack, executed and removed from the stack after its completion.
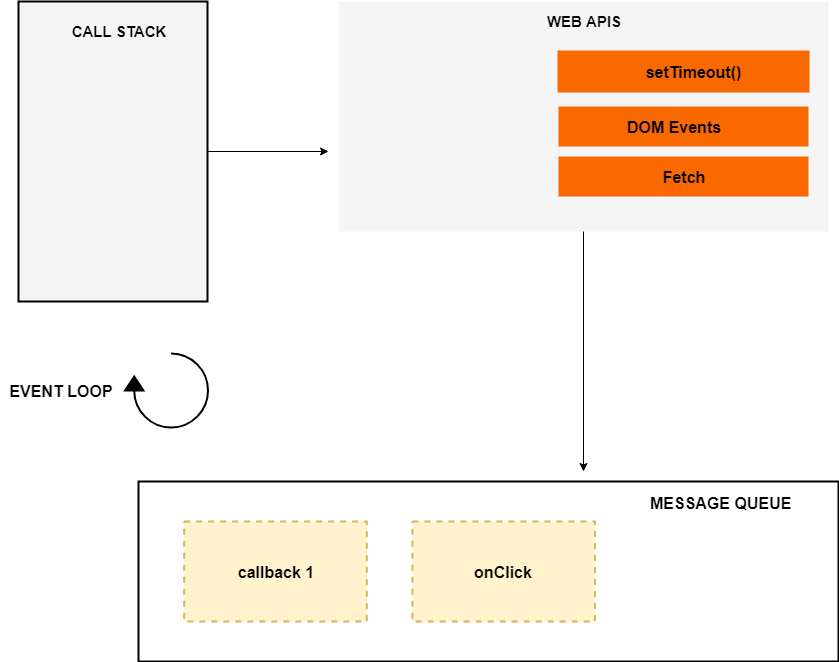
Meanwhile, the timer has expired, now the callback is pushed to the message queue. But the callback is not immediately executed, and that’s where the event loop kicks in.
The Event Loop
The job of the Event loop is to look into the call stack and determine if the call stack is empty or not. If the call stack is empty, it looks into the message queue to see if there’s any pending callback waiting to be executed.
In this case, the message queue contains one callback, and the call stack is empty at this point. So the Event loop pushes the callback to the top of the stack.
After that the console.log(‘Async Code’) is pushed to the top of the stack, executed and popped off from the stack. At this point, the callback has finished so it’s removed from the stack and the program finally finishes.
DOM Events
The Message queue also contains the callbacks from the DOM events such as click events and keyboard events. For example:
document.querySelector('.btn').addEventListener('click',(event) => {
  console.log('Button Clicked');
});
In case of DOM events, the event listener sits in the web APIs environment waiting for a certain event (click event in this case) to happen, and when that event happens, then the callback function is placed in the message queue waiting to be executed.
Again the event loop checks if the call stack is empty and pushes the event callback to the stack if it’s empty and the callback is executed.
We have learned how the asynchronous callbacks and DOM events are executed which uses the message queue to store all the callbacks waiting to be executed.
ES6 Job Queue/ Micro-Task queue
ES6 introduced the concept of job queue/micro-task queue which is used by Promises in JavaScript. The difference between the message queue and the job queue is that the job queue has a higher priority than the message queue, which means that promise jobs inside the job queue/ micro-task queue will be executed before the callbacks inside the message queue.
For example:
console.log('Script start');setTimeout(() => {
  console.log('setTimeout');
}, 0);new Promise((resolve, reject) => {
    resolve('Promise resolved');
  }).then(res => console.log(res))
    .catch(err => console.log(err));console.log('Script End');
Output:
Script start
Script End
Promise resolved
setTimeout
We can see that the promise is executed before the setTimeout, because promise response are stored inside the micro-task queue which has a higher priority than the message queue.
Let’s take another example, this time with two promises and two setTimeout. For example:
console.log('Script start');setTimeout(() => {
  console.log('setTimeout 1');
}, 0);setTimeout(() => {
  console.log('setTimeout 2');
}, 0);new Promise((resolve, reject) => {
    resolve('Promise 1 resolved');
  }).then(res => console.log(res))
    .catch(err => console.log(err));new Promise((resolve, reject) => {
    resolve('Promise 2 resolved');
  }).then(res => console.log(res))
    .catch(err => console.log(err));console.log('Script End');
This prints:
Script start
Script End
Promise 1 resolved
Promise 2 resolved
setTimeout 1
setTimeout 2
We can see that the two promises are executed before the callbacks in the setTimeout because the event loop prioritizes the tasks in micro-task queue over the tasks in message queue/task queue.
While the event loop is executing the tasks in the micro-task queue and in that time if another promise is resolved, it will be added to the end of the same micro-task queue, and it will be executed before the callbacks inside the message queue no matter for how much time the callback is waiting to be executed.
For example:
console.log('Script start');setTimeout(() => {
  console.log('setTimeout');
}, 0);new Promise((resolve, reject) => {
    resolve('Promise 1 resolved');
  }).then(res => console.log(res));new Promise((resolve, reject) => {
  resolve('Promise 2 resolved');
  }).then(res => {
       console.log(res);
       return new Promise((resolve, reject) => {
         resolve('Promise 3 resolved');
       })
     }).then(res => console.log(res));console.log('Script End');
This prints:
Script start
Script End
Promise 1 resolved
Promise 2 resolved
Promise 3 resolved
setTimeout
So all the tasks in micro-task queue will be executed before the tasks in message queue. That is, the event loop will first empty the micro-task queue before executing any callback in the message queue.
Conclusion
So we have learned how asynchronous JavaScript works and other concepts such as call stack, event loop, message queue/task queue and job queue/micro-task queue which together make the JavaScript runtime environment. While it’s not necessary that you learn all these concepts to be an awesome JavaScript developer, but it’s helpful to know these concepts 🙂
Credit @medium
![[Themeforest] Appside – App Landing Page – Freebiees Free Download](https://tran-it.s3.amazonaws.com/medias/2020/03/app-landing-page-featured..jpg)

![[CodeCanyon] WooCommerce Colors and Swatches for Variations](https://tran-it.s3.amazonaws.com/medias/2020/03/woocommerce-colors-swatches-featured.jpg)


