The support for pull requests in TeamCity was first implemented for GitHub as an external plugin. Starting with TeamCity version 2018.2 the plugin is bundled in the distribution package with no need to install the external plugin. The functionality has since been extended in version 2019.1 to support GitLab and BitBucket Server.
In this blog post, we will share some tips for building GitHub pull requests in TeamCity. First, there are a few things you need to know about when configuring the VCS root in regards to pull request handling. Next, we’ll cover Pull Requests and the Commit Status Publisher build features. And finally, we’ll see how it all comes together when building pull request branches.
Setting up a VCS root
First, let there be a VCS root in a TeamCity project. We can configure the VCS root in Build Configuration Settings | Version Control Settings and click Attach VCS root.
When setting up the VCS root we have to make sure that the branch specification does not match the pull request branches.
The branch specification in the screenshot above includes a +:refs/heads/feature-* filter. This means that any branch in the GitHub repository that starts with feature-* will be automatically detected by this VCS root. A pull request in GitHub is a git branch with a specific naming convention: refs/pulls/ID/head, whereas the ID is the number of the pull request submitted to the repository.
It is possible to configure the VCS root to match the incoming pull request branches and TeamCity will start the builds automatically. However, you might want to restrict the automatic build triggering for these branches. Hence, it is better to avoid adding +:* or refs/pulls/*patterns to the branch specification of a VCS root. Instead, we can use the Pull Requests build feature to gain more control over the incoming pull requests.
Configuring Pull Requests build feature
Pull request support is implemented as a build feature in TeamCity. The feature extends the VCS root’s original branch specification to include pull requests that match the specified filtering criteria.
To configure the pull requests support for a build configuration, go to Build Configuration Settings | Build Features, click Add build feature, and select the Pull Requests feature from the dropdown list in the dialog.
We can then configure the build feature parameters: select the VCS root, VCS hosting type (GitHub), credentials, and filtering criteria.
The Pull Requests build feature extends the branch specification of the related VCS root. As a result, the full list of branches that will be visible by the VCS root will include the following:
The default branch of the VCS root
Branches covered by the branch specification in the VCS root
Service-specific open pull request branches that match the filtering criteria, added by Pull Requests build feature
For GitHub’s pull request branches we can configure some filtering rules. For instance, we can choose to only build the pull requests automatically if they are submitted by a member of the GitHub organization.
In addition to this, we can also filter the pull requests based on the target branch. For instance, if the pull request is submitted to refs/head/master then the pull request branch will be visible in the corresponding VCS root. The pull request branches whose target branch does not match the value specified in the filter will be filtered out.
Publishing the build status to GitHub
For better transparency in the CI workflow, it is useful to have an indication of the build status from the CI server next to revision in the source control system. So when we look at a specific revision in the source control system we can immediately tell if the submitted change has been verified at the CI server. Many source control hosting services support this functionality and TeamCity provides a build feature to publish the build status into external systems, the Commit Status Publisher.
The build status indication is useful when reviewing the pull requests submitted to a repository on GitHub. It is advisable to configure the Commit Status Publisher build feature in TeamCity if you are working with pull requests.
Triggering the builds
The Pull Requests build feature makes the pull request branches visible to the related VCS root. But it does not trigger the builds. In order to react to the changes detected by the VCS root we need to add a VCS trigger to the build configuration settings.
To add the VCS trigger to a build configuration, go to Build Configuration Settings | Version Control Settings, click Add new trigger, and select the VCS trigger from the list.
The default value in the branch filter of the VCS trigger is +:*. It means that the trigger will react to the changes in all the branches that are visible in the VCS roots attached to the same build configuration. Consequently, when a pull request is submitted, the trigger will apply and the build will start for the pull request branch.
Building pull requests
Once the Pull Requests build feature is configured we can try submitting a change to a GitHub repository:
When the new pull request is created, we can choose the branch in the target repository. This is the branch we can filter in the Pull Requests build feature settings in TeamCity.
Once the pull request is submitted, TeamCity will detect that there’s a new branch in the GitHub repository and will start the build.
The build overview page in TeamCity provides additional details about the pull request.
The build status is also published to the GitHub repository by the Commit Status Publisher:
Here is a short screencast demonstrating the process above:
Summary
Now the puzzle pieces are coming together. The Pull Requests build feature extends the branch specification of the VCS root to match the pull request branches. The VCS trigger detects that a new pull request was submitted to the GitHub repository and triggers the build. Once the build is complete, the Commit Status Publisher sends the build status back to GitHub.
JavaScript (or ECMA Script) is an evolving language with lots of proposals and ideas on how to move forward. TC39 (Technical Committee 39) is the committee responsible for defining JS standards and features, and they have been quite active this year. Here is a summary of some proposals that are currently in “Stage 3”, which is the last stage before becoming “finished”. This means that these features should be implemented in browsers and other engines pretty soon. In fact, some of them are available now.
1. Private fields #
Available in Chrome & NodeJS 12
Yes, you read that right. Finally, JS is getting private fields in classes. No more this._doPrivateStuff(), defining closures to store private values, or using WeakMap to hack private props.
Here’s how the syntax looks
// private fields must start with '#'
// and they can't be accessed outside the class block

class Counter {
  #x = 0;

  #increment() {
    this.#x++;
  }

  onClick() {
    this.#increment();
  }

}

const c = new Counter();
c.onClick(); // works fine
c.#increment(); // error
Ever had to access a property nested a few levels inside an object and got the infamous error Cannot read property 'stop' of undefined. Then you change your code to handle every possible undefined object in the chain, like:
const stop = please && please.make && please.make.it && please.make.it.stop;

// or use a library like 'object-path'
const stop = objectPath.get(please, "make.it.stop");
We with optional chaining, soon you’ll be able to get the same done writing:
One of the reasons JS has always been terrible at Math is that we can’t reliably store numbers larger than 2 ^ 53, which makes it pretty hard to deal with considerably large numbers. Fortunately, BigInt is a proposal to solve this specific problem.
Without further ado
// can define BigInt by appending 'n' to a number literal
const theBiggestInt = 9007199254740991n;

// using the constructor with a literal
const alsoHuge = BigInt(9007199254740991);

// or with a string
const hugeButString = BigInt('9007199254740991');
You can also use the same operators on BigInt as you would expect from regular numbers, eg: +, -, /, *, %, … There’s a catch though, you can’t mix BigInt with numbers in most operations. Comparing Number and BigInt works, but not adding them
1n < 2
// true
1n + 2
// ?♀️ Uncaught TypeError: Cannot mix BigInt and other types, use explicit conversions
This one is pretty straightforward. It allows having static fields on classes, similar to most OOP languages. Static fields can be useful as a replacement for enums, and they also work with private fields.
class Colors {
  // public static fields
  static red = '#ff0000';
  static green = '#00ff00';

  // private static fields
  static #secretColor = '#f0f0f0';

}


font.color = Colors.red;

font.color = Colors.#secretColor; // Error
Allows you to use await at the top level of your code. This is super useful for debugging async stuff (like fetch) in the browser console without wrapping it in an async function.
Another killer use case is that it can be used at the top level of ES modules that initialize in an async manner (think about your database layer establishing a connection). When such an “async module” is imported, the module system will wait for it to resolve before executing the modules that depend on it. This will make dealing with async initialization much easier than the current workarounds of returning an initialization promise and waiting for it. A module will not know whether its dependency is async or not.
A weak reference to an object is a reference that is not enough to keep an object alive. Whenever we create a variable with (const, let, var) the garbage collector (GC) will never remove that variable from memory as long as it’s reference is still accessible. These are all strong references. An object referenced by a weak reference, however, may be removed by the GC at any time if there is no strong reference to it. A WeakRef instance has a method deref which returns the original object referenced, or undefined if the original object has been collected.
This might be useful for caching cheap objects, where you don’t want to keep storing all of them in memory forever.
const cache = new Map();

const setValue =  (key, obj) => {
  cache.set(key, new WeakRef(obj));
};

const getValue = (key) => {
  const ref = cache.get(key);
  if (ref) {
    return ref.deref();
  }
};

// this will look for the value in the cache
// and recalculate if it's missing
const fibonacciCached = (number) => {
  const cached = getValue(number);
  if (cached) return cached;
  const sum = calculateFibonacci(number);
  setValue(number, sum);
  return sum;
};
This is probably not a good idea for caching remote data as it can be removed from memory unpredictably. It’s better to use something like an LRU cache in that case.
Welcome to The Template Depot! We produce high-quality, creative templates that may help you land your dream job or simply create a better looking business. Professionally designed, we take a unique approach to boring business documents, creating modern, sophisticated and easy to use templates just for you!
Downloading the file will allow access to your professionally designed, 2 page resume template + cover letter. The template can be easily customised to your liking and includes all necessary files for a quick set-up. Delete or add anything you desire in the document, change colours or simply keep the original design.
▬▬▬▬▬▬▬▬▬▬▬▬▬▬▬▬▬▬▬▬▬▬▬
What you receive:
2 page resume template in .docx format ( in A4 and US Letter )
1 cover letter template in .docx format ( in A4 and US Letter )
1 instructional FAQ/Help pdf
A list of all the necessary fonts, plus links to download Customer support.
Easy to edit/customise – Add your name/experience/contact details etc
Both US letter and A4 resume/CV templates included
Detailed instruction guide
All Template files are in .docx format Font list included with links to download
▬▬▬▬▬▬▬▬▬▬▬▬▬▬▬▬▬▬▬▬▬▬▬
The process:
1) Add this listing to your cart. After purchase, the listing will be available immediately for download.
2) Read through the Help Guide and Font Guide. Download and install the fonts used.
3) Open your file in Word. Fill your own information into the template. Feel free to change colours, add or delete sections etc.
4) Print at home on paper of your choice or take it to a professional printer. PDF versions can be used via email or online.
▬▬▬▬▬▬▬▬▬▬▬▬▬▬▬▬▬▬▬▬▬▬▬
Requirements:
Microsoft Word (for Pc or Mac)
The Freebies you download from this site is 100% legal, we collect them from promotions from world’s seller websites, credit back to source is always available below this message (if you want to support author, please purchase their products to get recently updates.)
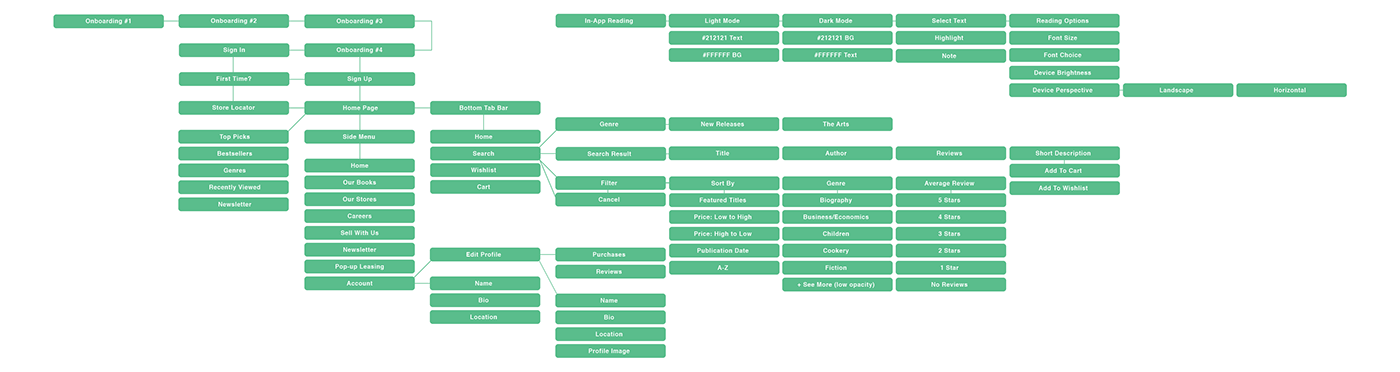
eBook UI KIT is online reading book UI kit ,which will lets you adjust fonts, font size, background colors, and other options. The XML and JAVA files contains comments at each and every point for easy understanding. Everything was made with a detail oriented style and followed by today’s Mobile trends. Clean coded & Layers are well-organized, carefully named, and grouped. Change text, colors and graphics, add or place photos.
Customize every elements as much, or as little as you want.
Customize elements (easy to edit)
100% free fonts
Perfect pixel (high quality design)
Features
Following are feature included into Blue Paper UI kit
Login Screen
Walk through Screen
Detail Home page with Clean UI
Music player
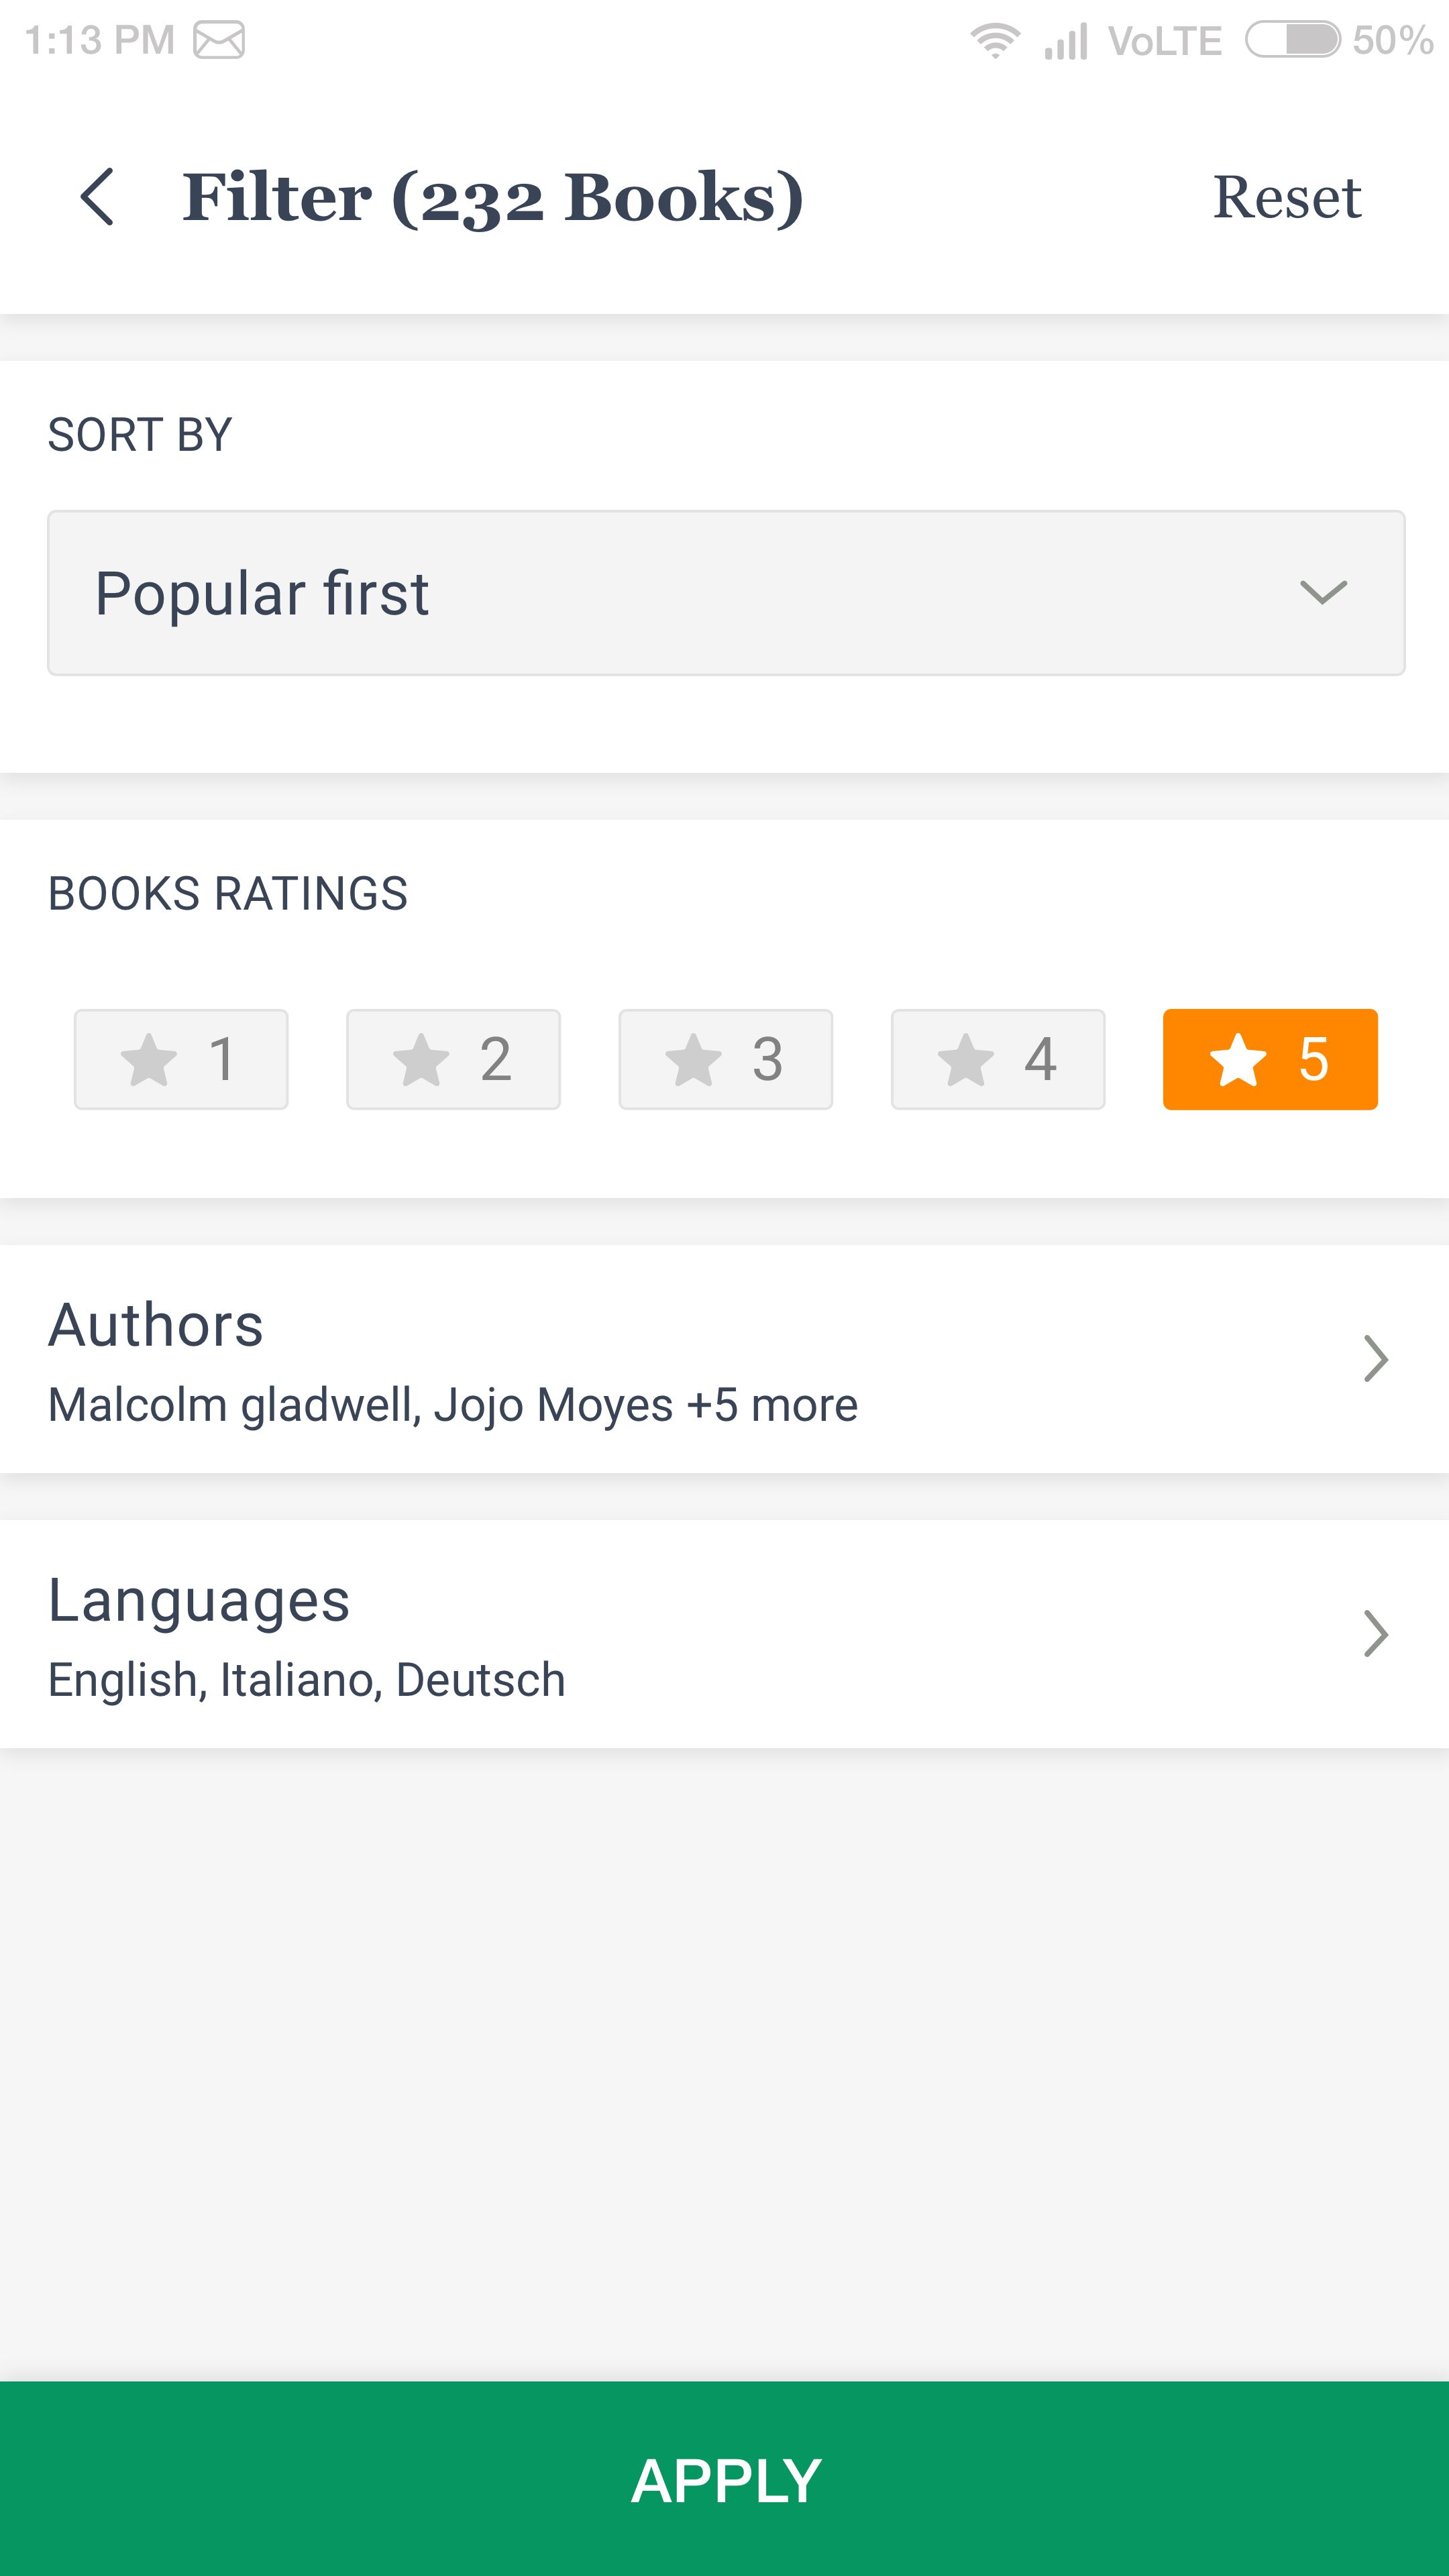
Filter Screen
My profile Page (My Library)
Search Page
Book detail page
Category page
Settings
And many more
Following are design as per user experience and have XML code for so design therefore will reduce your efforts in design and coding off 75+ in total working hours.
Requirements
Android studio
Sketch
The Freebies you download from this site is 100% legal, we collect them from promotions from world’s seller websites, credit back to source is always available below this message (if you want to support author, please purchase their products to get recently updates.)
Here’s a well designed bookstore Xd UI kit available to download right now. Many thanks to Blake Zajac for sharing this freebie.
The Freebies you download from this site is 100% legal, we collect them from promotions from world’s seller websites, credit back to source is always available below this message (if you want to support author, please purchase their products to get recently updates.)


![[Codester] – e-Book – Android Studio UI Kit – Freebies Free Download](https://tran-it.s3.amazonaws.com/medias/2019/08/preview-xl.jpg)
